Rating:
Information pump assy, supply Denso
Product
Fuel Injection Pump
Vehicle engine
PAJERO/MONTERO 4M41
Engine
4M41
Serial start-end
0910-
Info
This is replacement for SM294000-1070. SM294000-1260 can be used for -1070, but the opposite is not possible.
Injector Nozzle
MITSUBISHI
PUMP ASSY, SUPPLY
EA
- * SIAM DENSO PRODUCTION SM294000-126#.
- #..NEW PARTS ARE INTERCHANGEABLE WITH OLD ONE,
- IF NO.3,4 ARE CHANGED AT THE SAME TIME.
Compare Prices: .
As an associate, we earn commssions on qualifying purchases through the links below

WZCNLXLX Fuel Injection Pump 294000-1260 2940001260 1460A059 for Mitsubishi 4M41 Engine
WZCNLXLX Item Name:Fuel Injection Pump || Item Number:294000-1260 2940001260 1460A059 || Application:for Mitsubishi 4M41 Engine || Note: If you are unsure if the product is suitable.In order not to delay your use of the parts, please provide your engine nameplate or serial number and part number, and we will help you confirm if it is suitable. To avoid unnecessary returns, please check the product image and part number to ensure it is the product you want. || Tip: Please contact us - we are a professional sales team and we have many products to offer to you. Many buyers are very satisfied with our service. You can get first-class products and high-quality services from us, believe me, you will have a pleasant shopping experience here.
WZCNLXLX Item Name:Fuel Injection Pump || Item Number:294000-1260 2940001260 1460A059 || Application:for Mitsubishi 4M41 Engine || Note: If you are unsure if the product is suitable.In order not to delay your use of the parts, please provide your engine nameplate or serial number and part number, and we will help you confirm if it is suitable. To avoid unnecessary returns, please check the product image and part number to ensure it is the product you want. || Tip: Please contact us - we are a professional sales team and we have many products to offer to you. Many buyers are very satisfied with our service. You can get first-class products and high-quality services from us, believe me, you will have a pleasant shopping experience here.

Compatible with Mitsubishi Diesel Engine 4M41 Fuel Injection Pump 294000-1260 2940001260
KoovDem Part Number: 294000-1260 2940001260 Note: Please check the fitment carefully before purchase. Or just tell us the part number you need. || Part Name: Fuel Injection Pump || The 4M41 engine is a reliable and efficient powertrain option with exceptional performance and durability. Its robust design and advanced technology make it suitable for various vehicles and applications. With smooth power delivery, superior driving experience, and impressive fuel efficiency, this engine is perfect for both off-road and highway driving. Built to last, the 4M41 engine is a top choice for those seeking high-performance and reliability. || Suitable for use with Mitsubishi Diesel Engine 4M41 || Included in the package is one piece of the Fuel Injection Pump 294000-1260 (2940001260).
KoovDem Part Number: 294000-1260 2940001260 Note: Please check the fitment carefully before purchase. Or just tell us the part number you need. || Part Name: Fuel Injection Pump || The 4M41 engine is a reliable and efficient powertrain option with exceptional performance and durability. Its robust design and advanced technology make it suitable for various vehicles and applications. With smooth power delivery, superior driving experience, and impressive fuel efficiency, this engine is perfect for both off-road and highway driving. Built to last, the 4M41 engine is a top choice for those seeking high-performance and reliability. || Suitable for use with Mitsubishi Diesel Engine 4M41 || Included in the package is one piece of the Fuel Injection Pump 294000-1260 (2940001260).

Adfghjk HP3 Common Rail Fuel Injection Pump 294000-0661, 1460A022, 294000-0660, 1460A059, 1460A040, 294000-1260, Compatible with Mitsubishi Pajero 4M41, OEM-Level Diesel Pump Assembly(294000-0661)
Adfghjk HP3 High Pressure Common Rail Fuel Injection Pump 294000-0661】 Compatible with Mitsubishi Pajero Mitsubishi Pajero 4M41 design, factory level compatibility, accurate matching of fuel pressure and flow. || High-pressure common rail technology: ±1.5% injection error, optimize combustion efficiency, reduce carbon and NOx emissions. || Corrosion-resistant reinforced structure: aerospace-grade alloy steel core and ceramic-coated valve body, resistant to 2200Bar high pressure and diesel corrosion, with a life span of up to 180,000 kilometers. || Plug and Play Design: Integrated assembly directly replaces the original pump body, with 100% matching interface, 35 minutes quick installation without professional tools. || Strict quality control certification: ISO 9001 certified, compatible with Pajero 4M41 engine, compatible model: 1460A022/294000-0660 (please verify fitment before installation).
Adfghjk HP3 High Pressure Common Rail Fuel Injection Pump 294000-0661】 Compatible with Mitsubishi Pajero Mitsubishi Pajero 4M41 design, factory level compatibility, accurate matching of fuel pressure and flow. || High-pressure common rail technology: ±1.5% injection error, optimize combustion efficiency, reduce carbon and NOx emissions. || Corrosion-resistant reinforced structure: aerospace-grade alloy steel core and ceramic-coated valve body, resistant to 2200Bar high pressure and diesel corrosion, with a life span of up to 180,000 kilometers. || Plug and Play Design: Integrated assembly directly replaces the original pump body, with 100% matching interface, 35 minutes quick installation without professional tools. || Strict quality control certification: ISO 9001 certified, compatible with Pajero 4M41 engine, compatible model: 1460A022/294000-0660 (please verify fitment before installation).
You can buy:

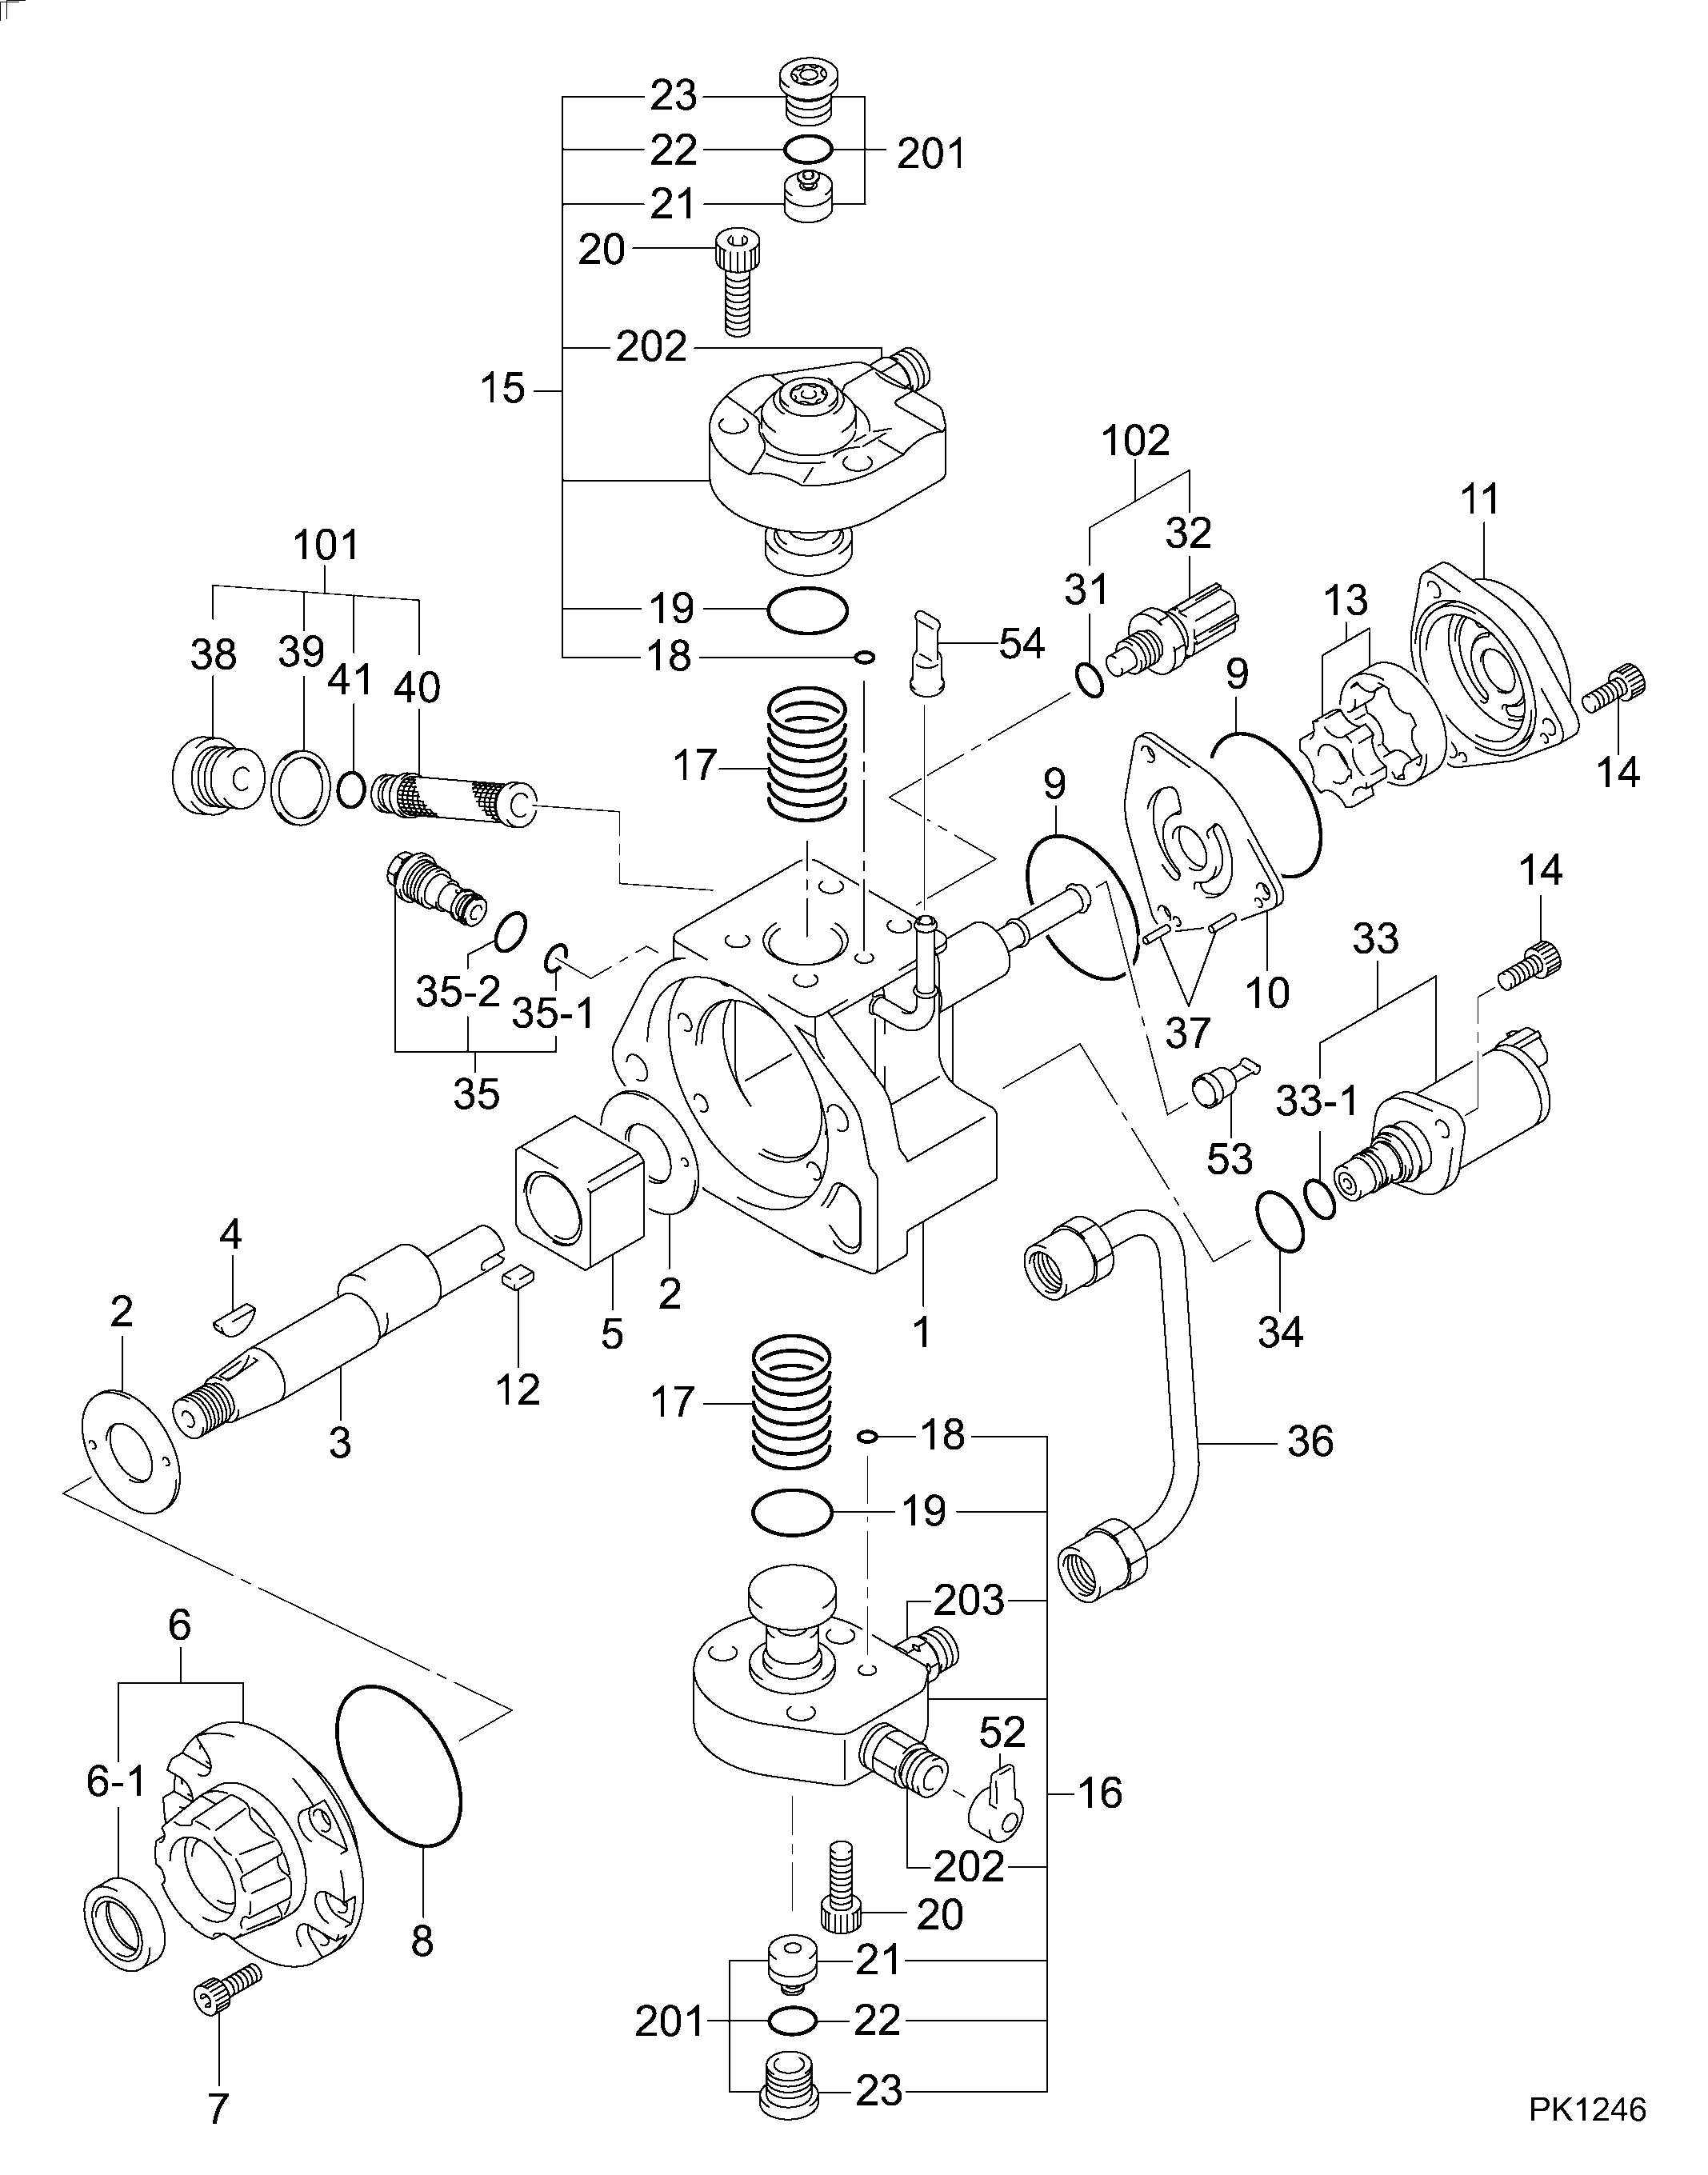
Components :
Scheme #.#:
№
Qty
Part num
Name
Remarks
Manufacture num
000
[01]
29400-01260
PUMP ASSY, SUPPLY
1460A059
MITSUBISHI
Include in ##:
29400-01260
as PUMP ASSY, SUPPLY
Cross reference number
Part num
Firm num
Firm
Name
29400-01260
1460A059
MITSUBISHI
PUMP ASSY, SUPPLY
2940001260
1460A059
MITSUBISHI
PUMP ASSY SUPPLY
2940001260
1460A059
MITSUBISHI
PUMP ASSY, SUPPLY
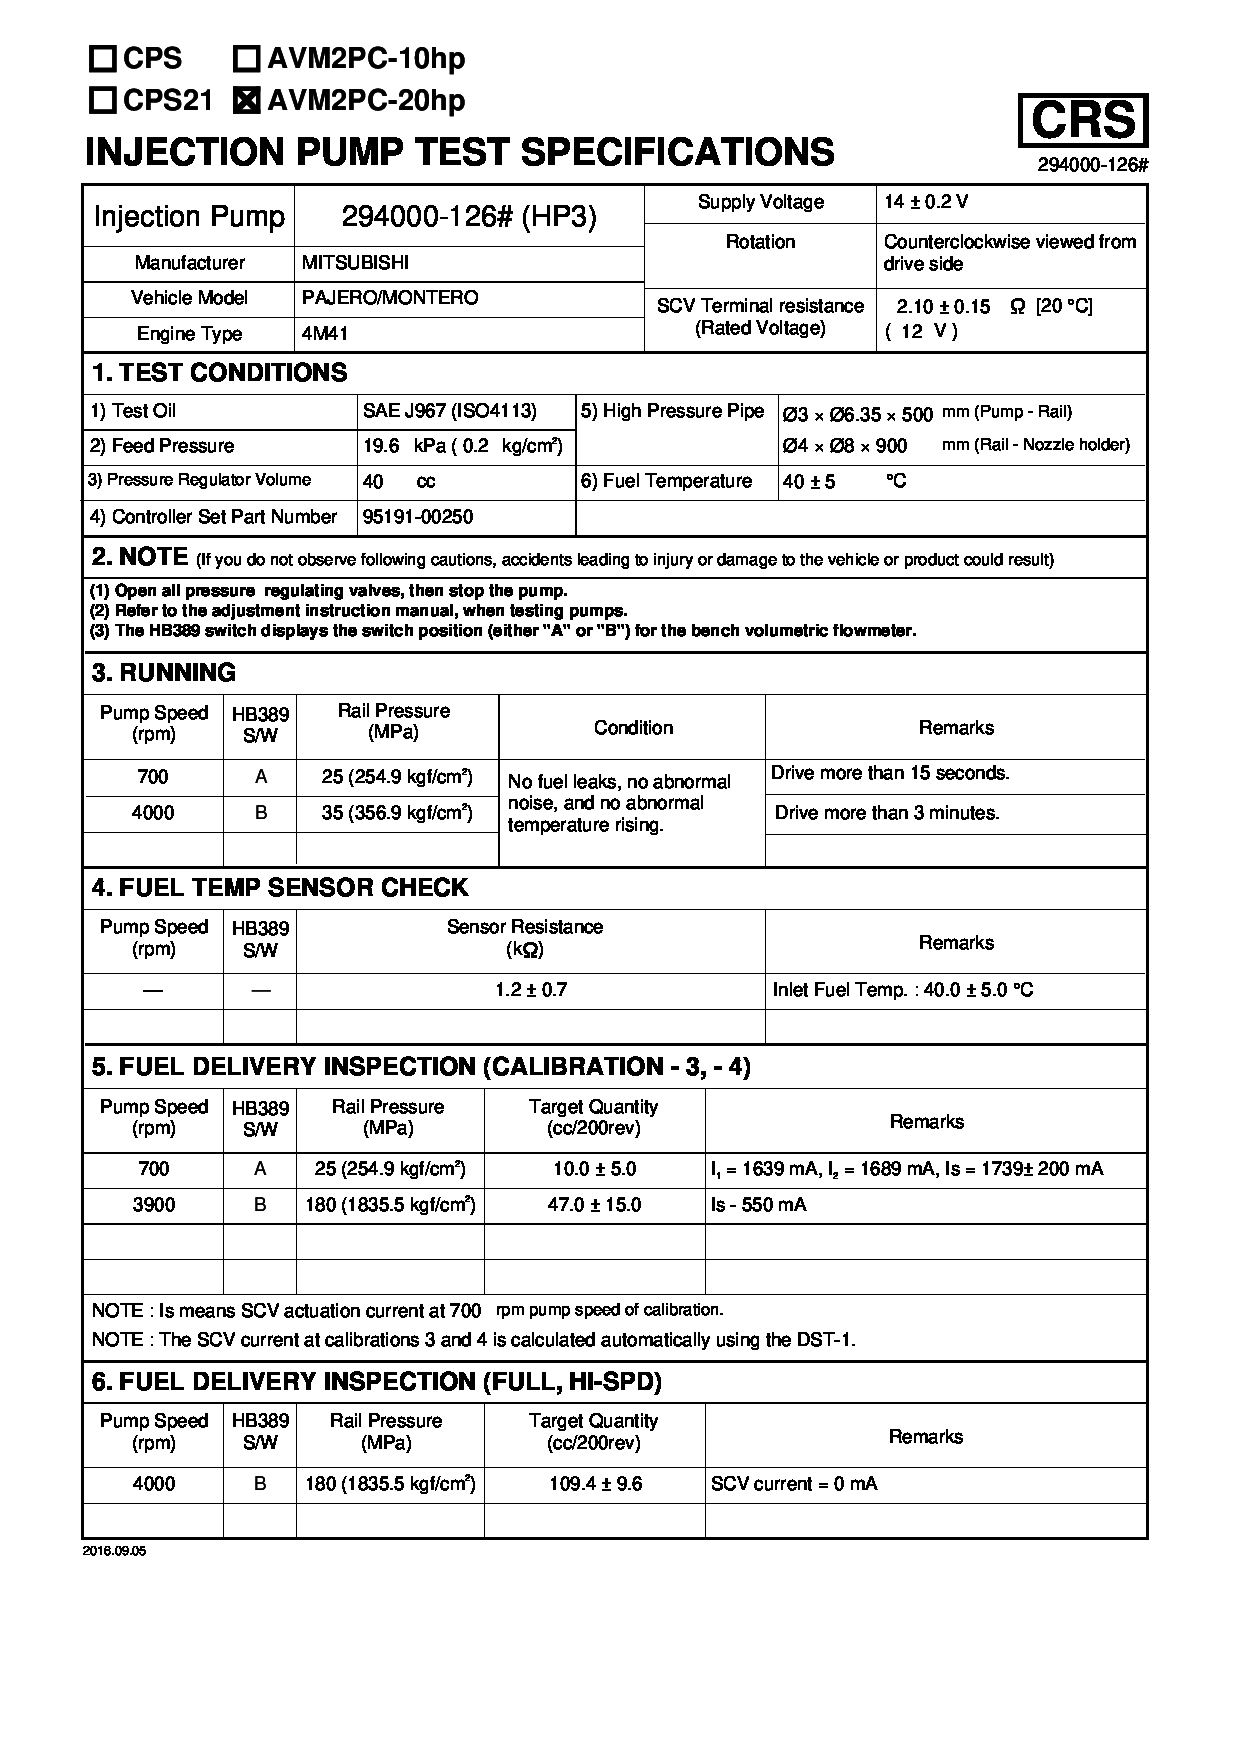
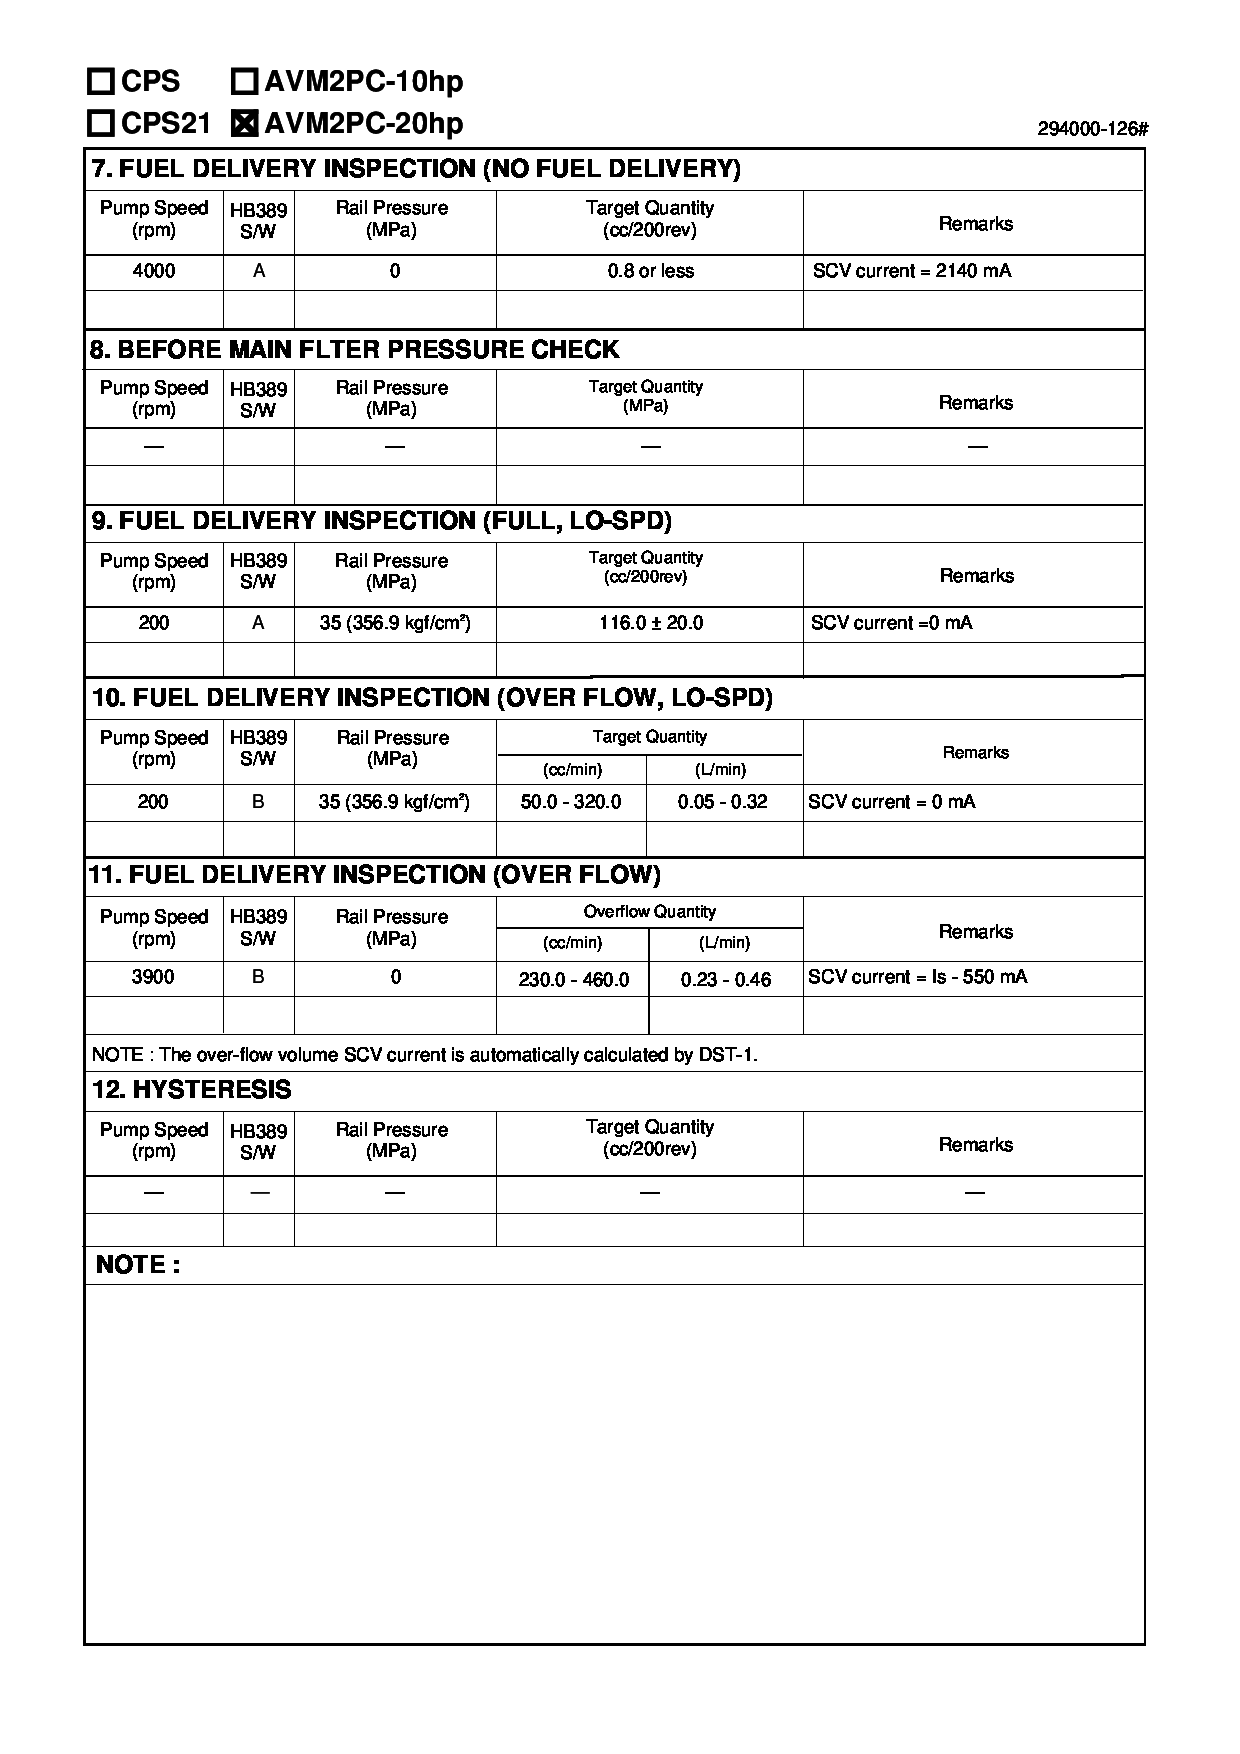
Test Calibration Data:
02EN126000
02EN126000
02EN126000
Information:
3. Remove bolts (1) and main bearing caps (2). Remove the lower halves of the main bearings from the caps.4. Install two of the bolts that hold the flywheel in place in the end of crankshaft. 5. Fasten a hoist and remove crankshaft (3) from the engine. The weight of the crankshaft is 54 kg (120 lb.).
Be careful not to cause damage to the crankshaft journals when the crankshaft is removed.
6. Remove the upper halves of the main bearings from the cylinder block.7. Install tooling (B) and remove the gear from the crankshaft. Install Crankshaft And Gear
1. Install the key for the crankshaft gear so it is even with the end of the crankshaft.2. Heat the crankshaft gear to a maximum temperature of 260°C (500°F). Install the gear on the crankshaft with the timing mark on the gear toward the pulley end of the crankshaft.3. Install the thrust bearing for the No. 4 main. Install the bearings dry when the clearance checks are made. Put clean engine oil on the bearings for final assembly.4. Install the upper main bearings (the bearings with oil hole) into the engine block.5. Install two of the bolts that hold the flywheel in place in the end of the crankshaft. Fasten a hoist and put the crankshaft in position in the block. Make sure the timing mark on the crankshaft gear is in alignment with the timing mark on the camshaft gear. For more detail about installation of main bearings see REMOVE AND INSTALL CRANKSHAFT MAIN BEARINGS.
When the bearing caps are installed, make sure the number on the side of the cap is next to and respective with the number on the engine block.
When the bearing clearance is checked and the engine is in a vertical position, the crankshaft will have to be lifted up with a force equal to the weight of the crankshaft and held against the upper halves of the main bearings to get a correct measurement with Plastigage. The Plastigage will not hold the weight of the crankshaft and give a correct indication. If the engine is in a horizontal position, such as on an engine stand, it is not necessary to hold the crankshaft up. Do not turn crankshaft when Plastigage is in position to check clearance. 6. Check the bearing clearance with Plastigage. Put the lower main bearings into the caps. Put the caps in position and install the bolts. Tighten the bolts in number sequence as follows: a) Tighten bolts 1 through 10 to a torque of 40 4 N m (30 3 lb.ft.).
Do not use an impact wrench to tigthen the nuts the additional 120 5°.
b) Put a mark on each bolt head and bearingcap. Tighten bolts 1 through 10 120 5° more.7. Remove the bearing caps and measure the thickness of the Plastigage. The main bearing clearance must be 0.076 to 0.168 mm (.0030 to .0066 in.). The maximum permissible clearance is 0.18 mm (.007 in.). 8. Put 2P2506 Thread