Rating:
Information pump assy, supply Denso
Compare Prices: .
As an associate, we earn commssions on qualifying purchases through the links below

Diesel Injection Fuel Pump 294000-0422 Compatible For MAZDA RF7J13000
CFNCFJGJ [Part number] : 294000-0422 || [Easy installation] : Standard interface, easy installation, plug and play, no professional skills, easy installation. || [Durable and reliable] : After multiple tests, long life, excellent quality, and stable work in extreme environments. || [Efficient and stable] : With the support of advanced technology, fuel supply is efficient and stable, ensuring the smooth flow of vehicles. || [High quality] : The use of high-quality materials and smart design, strict testing and verification, to ensure long-term stability and high reliability.
CFNCFJGJ [Part number] : 294000-0422 || [Easy installation] : Standard interface, easy installation, plug and play, no professional skills, easy installation. || [Durable and reliable] : After multiple tests, long life, excellent quality, and stable work in extreme environments. || [Efficient and stable] : With the support of advanced technology, fuel supply is efficient and stable, ensuring the smooth flow of vehicles. || [High quality] : The use of high-quality materials and smart design, strict testing and verification, to ensure long-term stability and high reliability.

Fuel injection Pump 294000-0422 SX001-12178 for Mazda Engine RF7J
AUCALIWI Part number:294000-0422,SX001-12178 || Application:for Mazda Engine RF7J
AUCALIWI Part number:294000-0422,SX001-12178 || Application:for Mazda Engine RF7J

Diesel Injection Fuel Pump 294000-0422 Compatible With MAZDA RF7J13000
HXYAIEOGD Ensure the continuous and stable operation of the engine. || The installation procedure is simple. || Ensure OE number before placing order. || The warranty period is 12 months. || 1 piece jet pump
HXYAIEOGD Ensure the continuous and stable operation of the engine. || The installation procedure is simple. || Ensure OE number before placing order. || The warranty period is 12 months. || 1 piece jet pump
You can buy:

Include in ##:
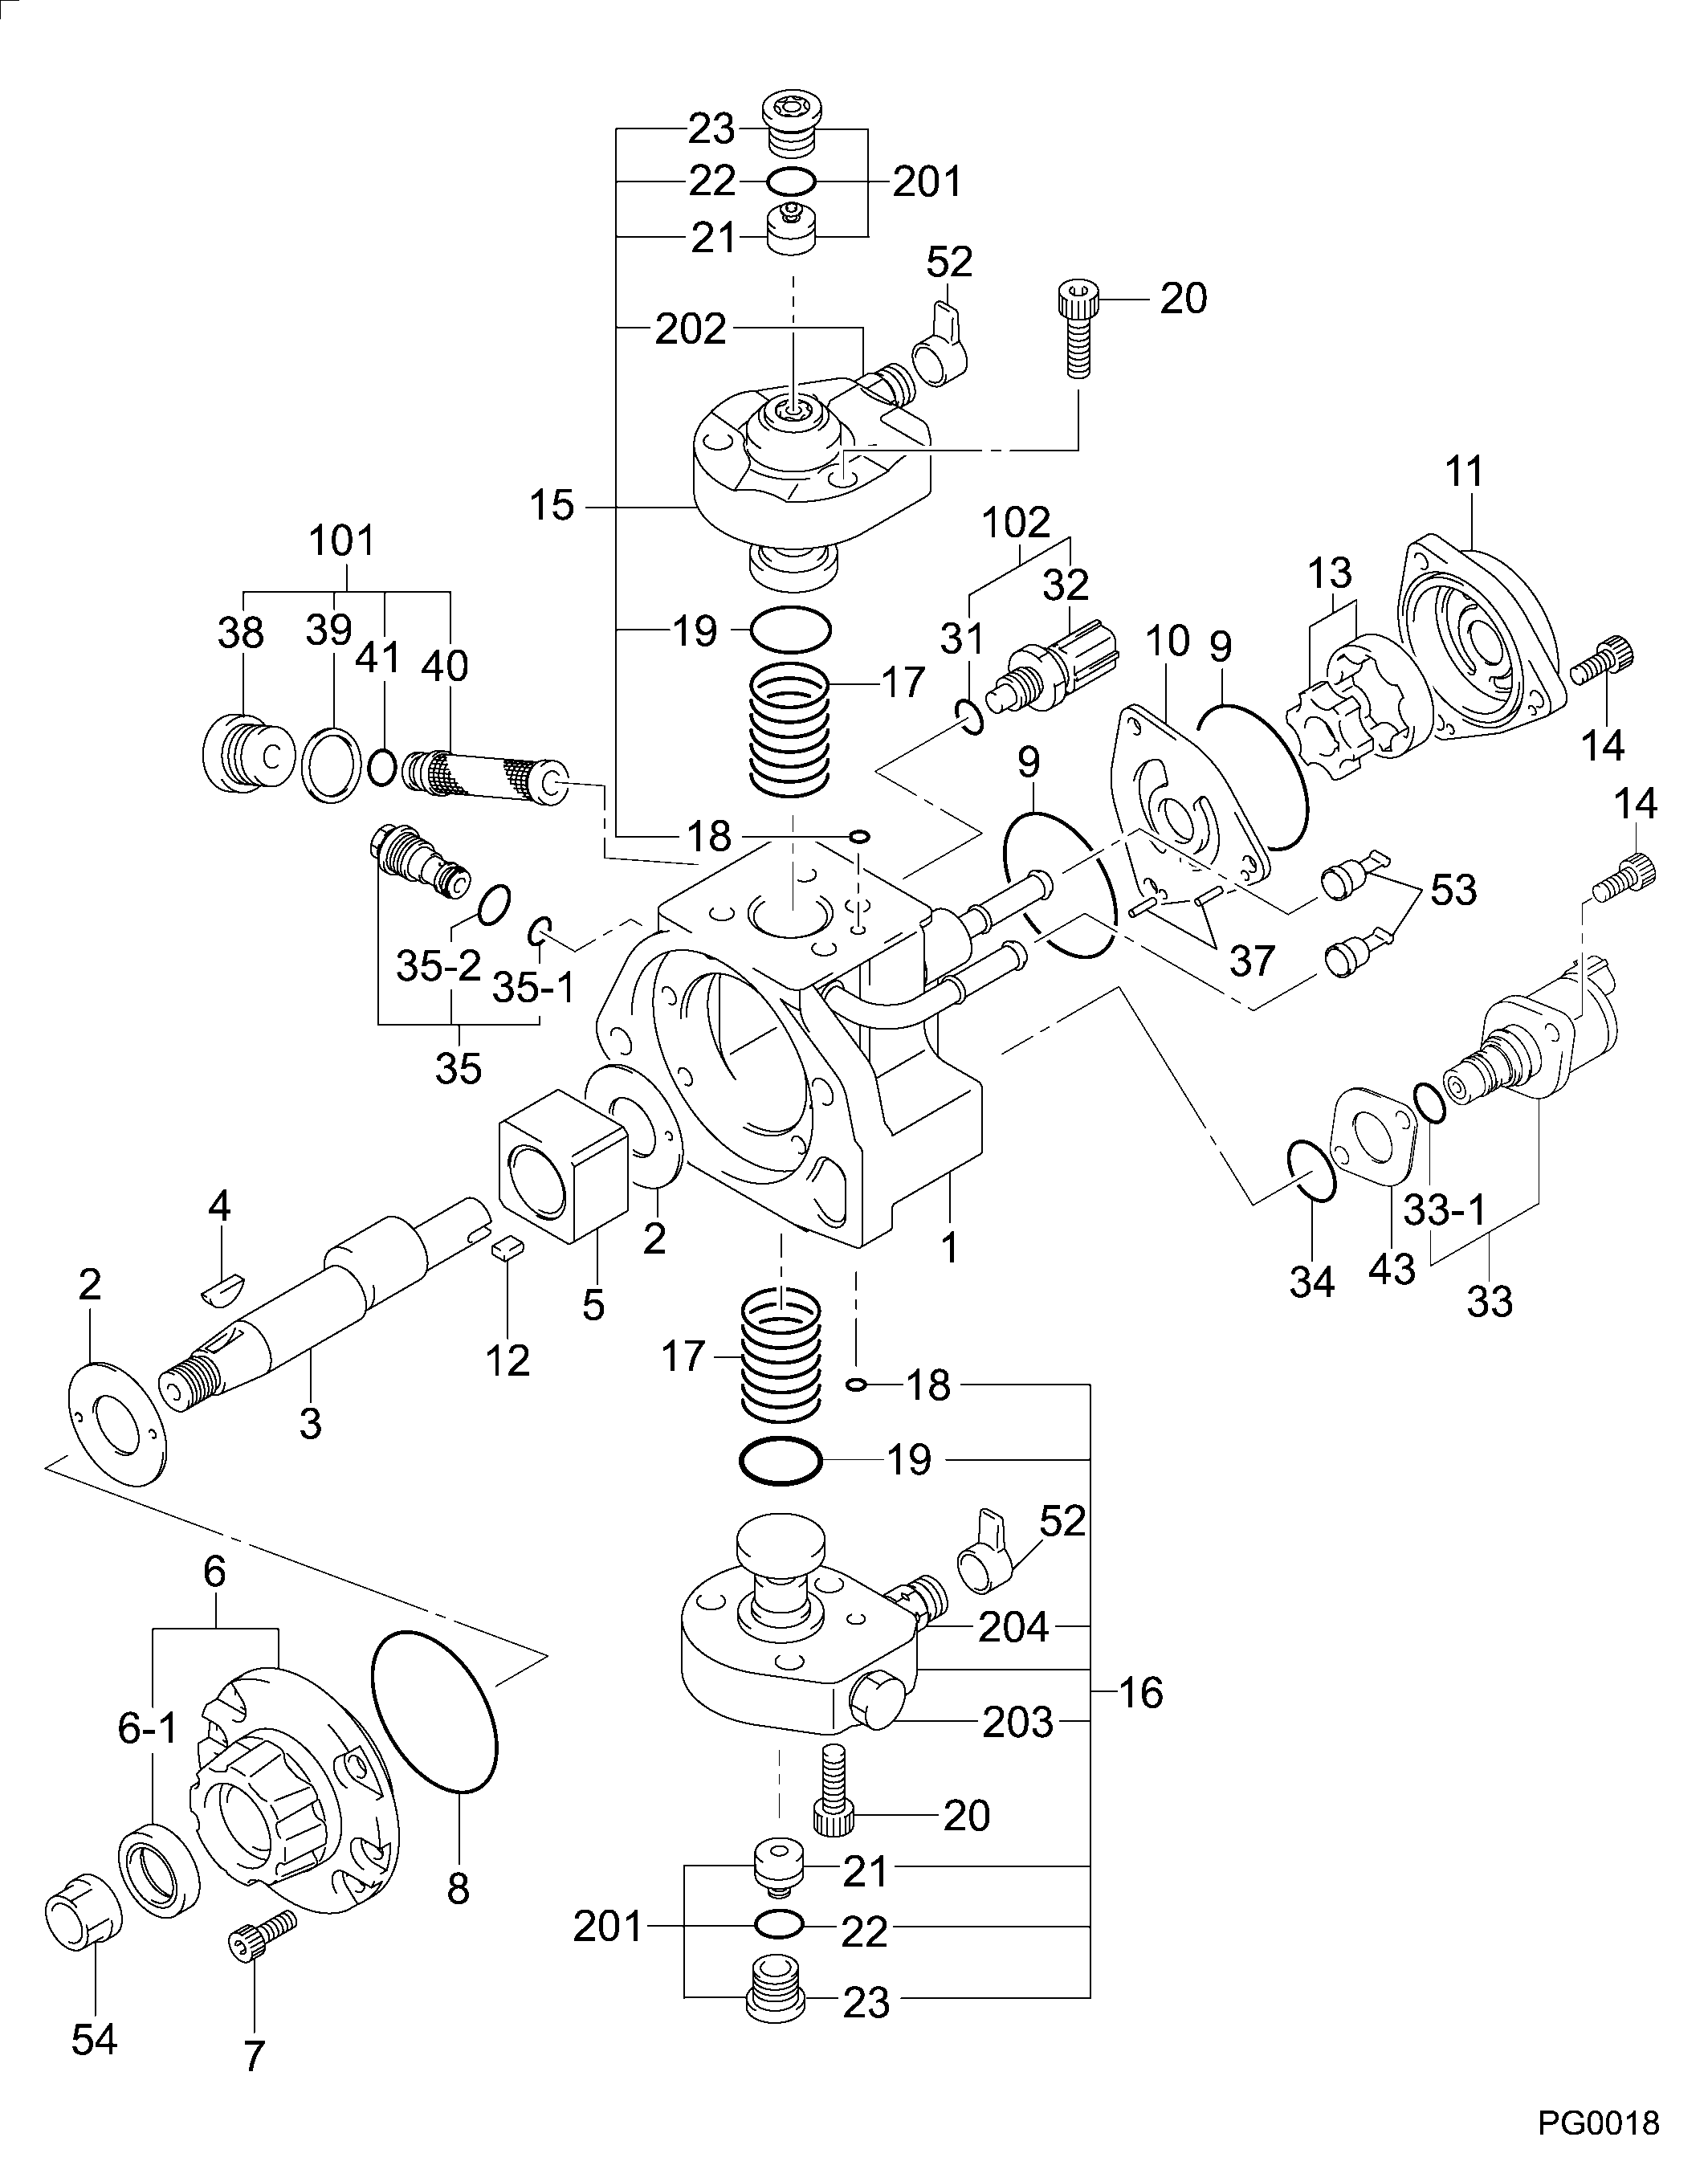
Cross reference number
Part num
Firm num
Firm
Name
29400-00422
RF7J 13 80
PUMP ASSY, SUPPLY
Information:
1. Bend the tabs of the locks from bolts (2) and remove bolts (2) and sleeve (1).2. Remove five bolts (3) from the flywheel housing. 3. Remove the two bolts and remove tachometer drive (8) from flywheel housing (7).4. Remove the five bolts that hold the flywheel housing to the timing gear plate on the left side of the engine.5. Remove two bolts (5), the three bolts (6) and bolt (9).6. Remove the two bolts that hold the flywheel housing to the timing gear plate at the accessory drive on the right side of the engine.7. Remove nuts (4), and use two persons to remove flywheel housing (7). The weight of the flywheel housing is 90 lb. (41 kg).Install Flywheel Housing
1. Clean the surface of the timing gear plate and put the flywheel housing gasket in position. 2. Put flywheel housing (1) in position and install the nuts and bolts to hold it. 3. Tighten two bolts (3) to a torque of 40 5 lb. ft. (55 7 N m). Tighten three bolts (2) to a torque of 95 10 lb. ft. (130 14 N m). 4. Put the O-ring seal (4) on tachometer drive and install the tachometer drive. Make sure tachometer drive is correctly engaged with the drive shaft before the bolts that hold it are tightened. 5. Install sleeve (5) evenly on the crankshaft rear seal and install the bolts and locks to hold it.end by: a) install BrakeSaverb) install BrakeSaver control valvec) install electric starting motord) install air compressore) install oil pan
1. Clean the surface of the timing gear plate and put the flywheel housing gasket in position. 2. Put flywheel housing (1) in position and install the nuts and bolts to hold it. 3. Tighten two bolts (3) to a torque of 40 5 lb. ft. (55 7 N m). Tighten three bolts (2) to a torque of 95 10 lb. ft. (130 14 N m). 4. Put the O-ring seal (4) on tachometer drive and install the tachometer drive. Make sure tachometer drive is correctly engaged with the drive shaft before the bolts that hold it are tightened. 5. Install sleeve (5) evenly on the crankshaft rear seal and install the bolts and locks to hold it.end by: a) install BrakeSaverb) install BrakeSaver control valvec) install electric starting motord) install air compressore) install oil pan