Rating:
Information pump assy, supply Denso
Compare Prices: .
As an associate, we earn commssions on qualifying purchases through the links below

Compatible with Cummins Engine ISX ISBE 220HP Fuel Injection Pump 4898921 489-8921
KoovDem Part Number: 294000-0313 294000-0316 || Part Name: Fuel Injection Pump || The 2AD-FTV engine is renowned for its reliable performance and fuel efficiency. It features advanced technology that ensures smooth and powerful operation, making it ideal for everyday driving comfort and longevity. This engine is a top choice for those looking for a dependable and efficient vehicle. || Produced specifically for the Toyota Engine 2AD-FTV, this product is marked by part numbers 221000R010 and 2940000313. Crafted with precision and high-quality materials, it ensures seamless integration for optimal performance and longevity. Trust in its compatibility to maintain the reliability and efficiency of your Toyota engine in the long term. || If you encounter several part numbers on the link that need clarification, please leave a note or contact our customer service team so we can give you the correct part number or engine model details to avoid any unnecessary returns. We appreciate your cooperation.
KoovDem Part Number: 294000-0313 294000-0316 || Part Name: Fuel Injection Pump || The 2AD-FTV engine is renowned for its reliable performance and fuel efficiency. It features advanced technology that ensures smooth and powerful operation, making it ideal for everyday driving comfort and longevity. This engine is a top choice for those looking for a dependable and efficient vehicle. || Produced specifically for the Toyota Engine 2AD-FTV, this product is marked by part numbers 221000R010 and 2940000313. Crafted with precision and high-quality materials, it ensures seamless integration for optimal performance and longevity. Trust in its compatibility to maintain the reliability and efficiency of your Toyota engine in the long term. || If you encounter several part numbers on the link that need clarification, please leave a note or contact our customer service team so we can give you the correct part number or engine model details to avoid any unnecessary returns. We appreciate your cooperation.

Fits For Perkins Engine 1104D-44T Fuel Injection Pump 2644C313 9520A383G 9520A381G
KoovDem Part Number:294000-0870 22100-0R01 || Part Name: Fuel Injection Pump || Crafted for use with the Toyota Diesel Engine 2AD-FTV, this product is tailor-made to cater to the unique requirements of this specific engine model. It adheres to the exact specifications and standards of the 2AD-FTV engine, guaranteeing top-notch performance and maximum efficiency. Whether for routine maintenance, repairs, or enhancements, this product is a trustworthy option for individuals dealing with the Toyota Diesel Engine 2AD-FTV.
KoovDem Part Number:294000-0870 22100-0R01 || Part Name: Fuel Injection Pump || Crafted for use with the Toyota Diesel Engine 2AD-FTV, this product is tailor-made to cater to the unique requirements of this specific engine model. It adheres to the exact specifications and standards of the 2AD-FTV engine, guaranteeing top-notch performance and maximum efficiency. Whether for routine maintenance, repairs, or enhancements, this product is a trustworthy option for individuals dealing with the Toyota Diesel Engine 2AD-FTV.
Compatible with Cummins Engine 6CT 6CTA 6CT8.3 Fuel Injection Pump 3921970 0402736823
KoovDem Part Number:294000-0870 22100-0R01 || Part Name: Fuel Injection Pump || The 2AD-FTV engine is well-known for its outstanding reputation in the automotive industry due to its reliable performance, exceptional fuel efficiency, and durability. Incorporating state-of-the-art technology and high-quality components, this engine guarantees a smooth and powerful driving experience, making it a preferred choice for drivers looking for a dependable and efficient vehicle option that delivers longevity and top-notch performance. || This specific product is crafted for utilization alongside the Toyota Diesel Engine 2AD-FTV. It has been meticulously engineered to seamlessly integrate and operate efficiently with this particular engine model, guaranteeing peak performance and operational effectiveness. Customers can rely on the consistent and dependable functionality of this product when paired with their Toyota Diesel Engine 2AD-FTV, ensuring a smooth and reliable experience.
KoovDem Part Number:294000-0870 22100-0R01 || Part Name: Fuel Injection Pump || The 2AD-FTV engine is well-known for its outstanding reputation in the automotive industry due to its reliable performance, exceptional fuel efficiency, and durability. Incorporating state-of-the-art technology and high-quality components, this engine guarantees a smooth and powerful driving experience, making it a preferred choice for drivers looking for a dependable and efficient vehicle option that delivers longevity and top-notch performance. || This specific product is crafted for utilization alongside the Toyota Diesel Engine 2AD-FTV. It has been meticulously engineered to seamlessly integrate and operate efficiently with this particular engine model, guaranteeing peak performance and operational effectiveness. Customers can rely on the consistent and dependable functionality of this product when paired with their Toyota Diesel Engine 2AD-FTV, ensuring a smooth and reliable experience.
Components :
Scheme #.#:
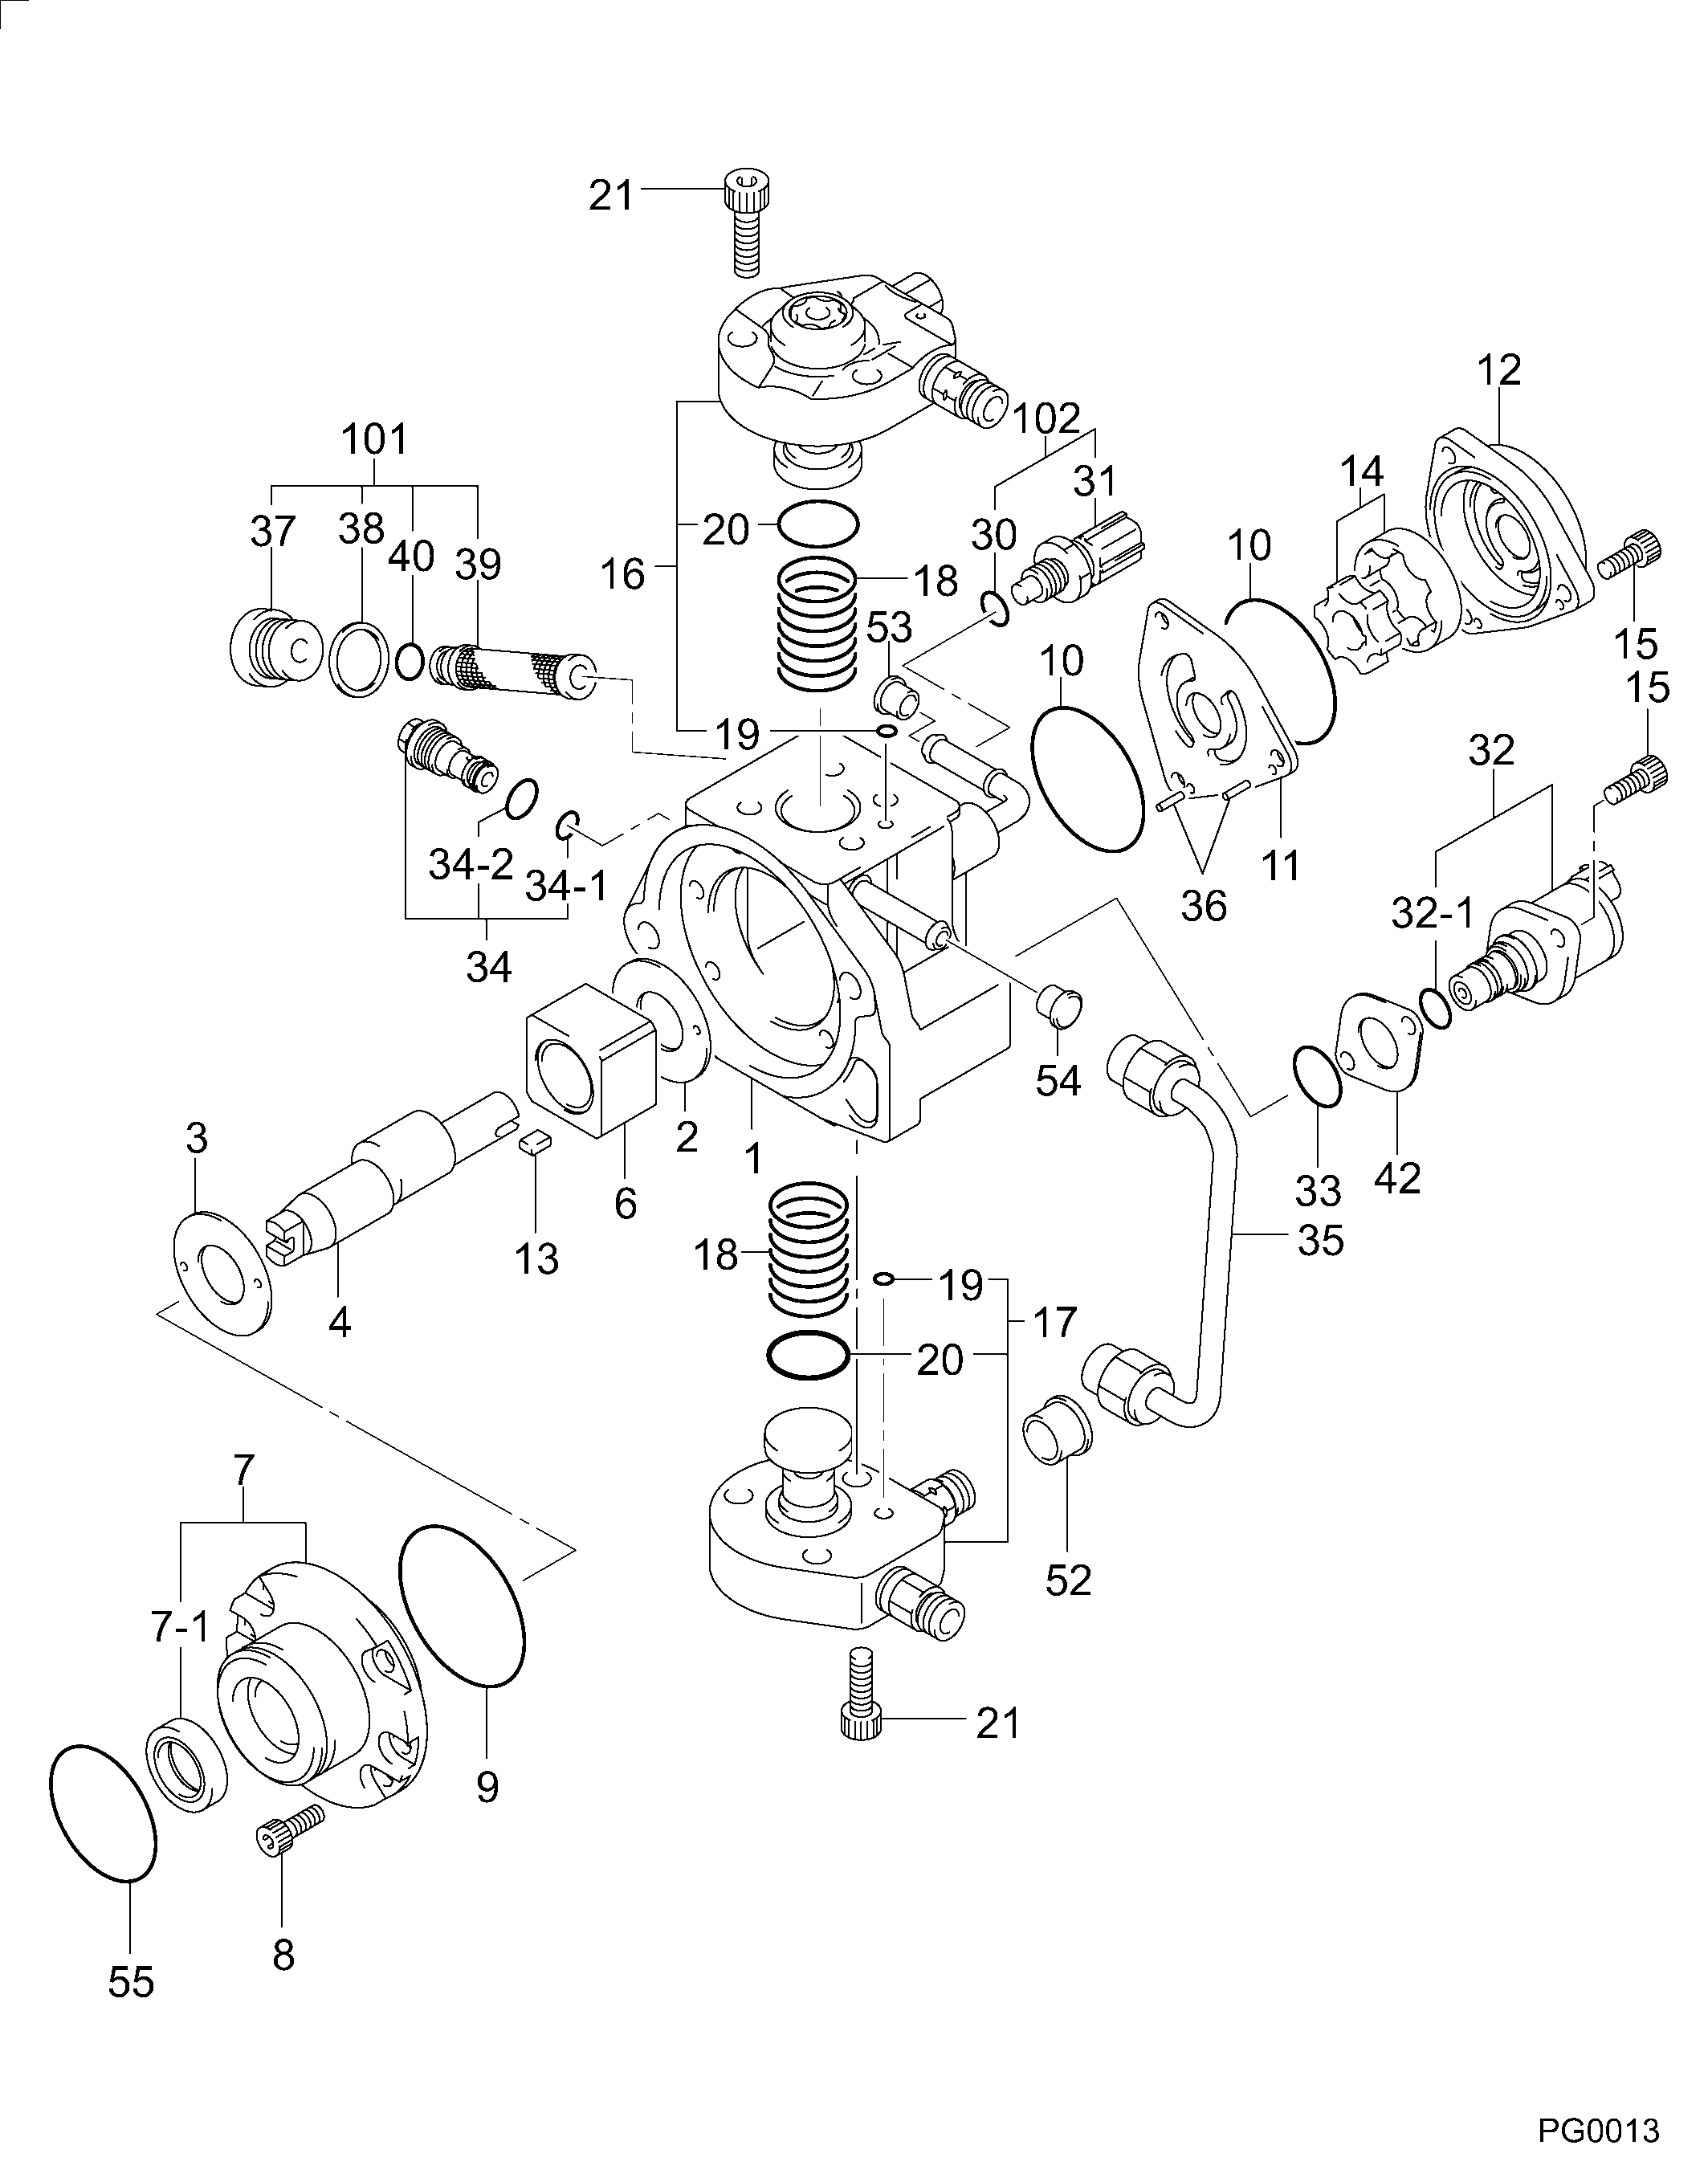
№
Qty
Part num
Name
Remarks
Manufacture num
000
[01]
29400-00316
PUMP ASSY, SUPPLY
HP3
22100-0R010
TOYOTA
Include in ##:
29400-00316
as PUMP ASSY, SUPPLY
Cross reference number
Part num
Firm num
Firm
Name
29400-00316
22100-0R01
PUMP ASSY, SUPPLY
Information:
start by:a) remove oil pump 1. Check each main bearing cap (2) for its location on the engine. Each cap has an arrow (1) to show the front of the block and a number (3) which gives the location of that cap.2. Remove No. 2 through No. 4 main bearing caps from the engine. Remove the lower bearings from the caps.3. Remove the thrust plate from each side of the No. 3 upper main bearing. 4. Turn the crankshaft until tool (A) can be installed in oil hole (4). Turn the crankshaft in the direction which will push the upper main bearing out, tab end first.
If the crankshaft is turned in the wrong direction, the tab of the bearing will be pushed between the crankshaft and the cylinder block. This will cause damage to the crankshaft and block.
5. Install lower bearings in the bearing caps.6. Install upper bearing in the cylinder block with tool (A). Be sure tab (5) on the back of the bearings fits in the groove of the caps and cylinder block.
When bearing caps are installed, make sure the caps are installed with the part number toward the front of the engine and the number on the bottom of the cap is the same as the number on the camshaft side of the engine.
When the bearing clearance is checked and the engine is in a vertical position, such as in the vehicle, the crankshaft will have to be lifted up and held against the upper halves of the main bearings to get a correct measurement with Plastigage (B). The Plastigage will not hold the weight of the crankshaft and give a correct indication. If the engine is in a horizontal position, such as on an engine stand, it is not necessary to hold the crankshaft up. Do not turn crankshaft when Plastigage is in position to check clearance.7. Check the bearing clearance with tool (B) as follows: a) Put tool (B) in position as shown.b) Put clean oil on the threads of the cap bolts. Install the caps and cap bolts, finger tight.c) Tighten the bolts on the tab end of the caps first to a torque of 190 10 lb.ft. (260 14 N m).d) Tighten the bolts on the other end of the caps to a torque of 190 10 lb.ft. (260 14 N m). e) Put a mark across the bolt head and cap. Tighten the bolts opposite the tab end 120°. Tighten the bolts on the tab end of the cap 120° more. Make sure the main bearing caps are installed with their identification number (7) in alignment with the identification number on the left side of the cylinder block and arrow (6) toward the front of the block.8. Remove the main bearing caps and tool (B).9. Measure the width of the Plastigage to determine the bearing clearance. The clearance for new bearings must be .0036 to .0073 in. (0.091 to 0.186 mm). The maximum clearance for used