Rating:
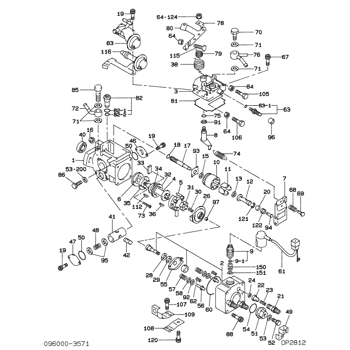
Information pump assy, injecti Denso
Product
Fuel Injection Pump
Vehicle engine
CHARADE CL
Engine
CL
Serial start-end
8701--8808
Info
Injector Nozzle
093500-3480
Injector nozzle:
0935003480
KIT List:
Part name
Kit1
Kit2
Components :
Scheme #.#:
№
Qty
Part num
Name
Remarks
Manufacture num
Cross reference number
Part num
Firm num
Firm
Name
09600-03570
PUMP ASSY, INJECTI
Information:
Illustration 1 g00669441
CCM to Host Equipment Direct Connection (1) CCM (2) CCM RS-232C port (3) Computer RS-232C port (4) Host equipmentMake sure that the following equipment is available:
A personal computer. Refer to "Caterpillar CCM PC For Windows: Getting Started Manual" for specifications on the PC.
The proper RS-232C cables are required for the particular installation. Refer to the Operation and Maintenance Manual, "RS-232C Cable Requirements".
The CCM PC Software for Windows. This software is available from Caterpillar.ProcedurePerform the following procedure to initialize communication with the host equipment that is connected directly to the CCM.Note: The host equipment and the CCM should be turned OFF before you change the cables to the serial ports.
The CCM should be installed with all of the wiring. Refer to Operations and Maintenance Manual, "General Wiring Diagram" and "RS-232C Cable Requirements".
Determine the parameters for communication for the installation. The default rate of communication (bits per second or bps) is 9600. The remaining default settings from the factory are no parity, 8 data bits, and 1 stop bit. These parameters will work well in most installations. Use the Operations and Maintenance Manual, "Communication Parameters - Identify" to determine the parameters of communication that are stored in the CCM.
Load the CCM PC For Windows software into the PC. Refer to the "Caterpillar CCM PC For Windows: Getting Started Manual". Start the CCM PC program and connect to the CCM.
Go to the Data Link pull-down menu. Select ECM, CCM. Go to the CCM configuration screen in the Utilities menu. Set the parameters for communication to match the values that were chosen in step 2.
Use the CCM configuration screen to set the Connection Type to Direct Connection. The CCM is now set at the determined communication configuration.Note: If the PC is required to communicate with the CCM, go to the Phone Book pull-down menu and select Add or Edit. Set the communication parameters of the PC to the values that were chosen in Step 2.Note: The electronic controller of each engine must be programmed with the correct engine number for identification on the CCM. The electronic controller is programmed to Engine Number 1 at the factory. Refer to Operation and Maintenance Manual, SEBU6874, "Engine Number - Program".Note: After the CCM has been connected to the PC, refer to the "CCM PC Software Users Manual". This manual contains instructions on monitoring and on controlling the engine remotely.Note: Two conditions must be met before the electronic engine controller will allow control by the CCM. The Engine Control Switch must be in the AUTO position, and the remote initiate contacts must be open. The engine may be monitored with the ECS in any position.Note: For an EMCP II application, the CCM cannot control the generator set if the GSC is in Service Mode. The generator set can only be monitored.


