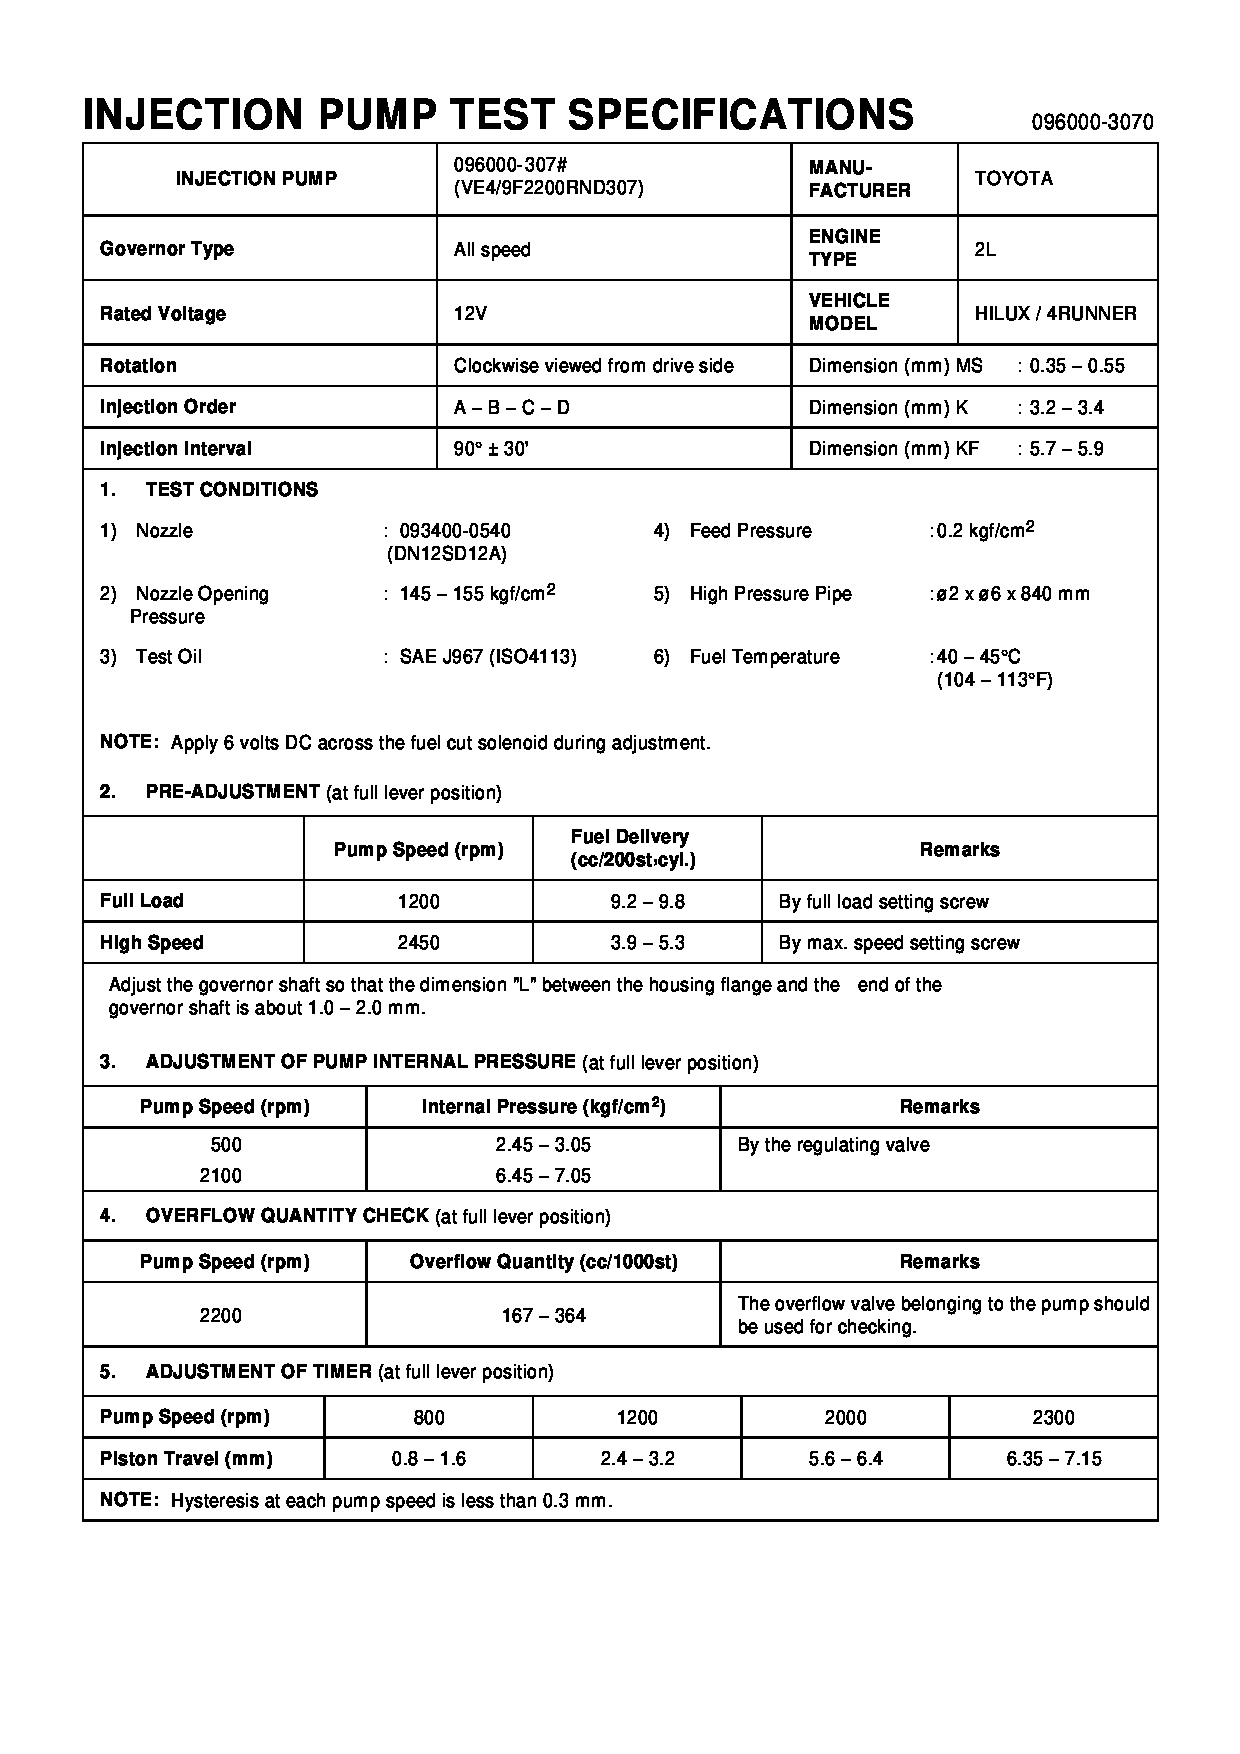
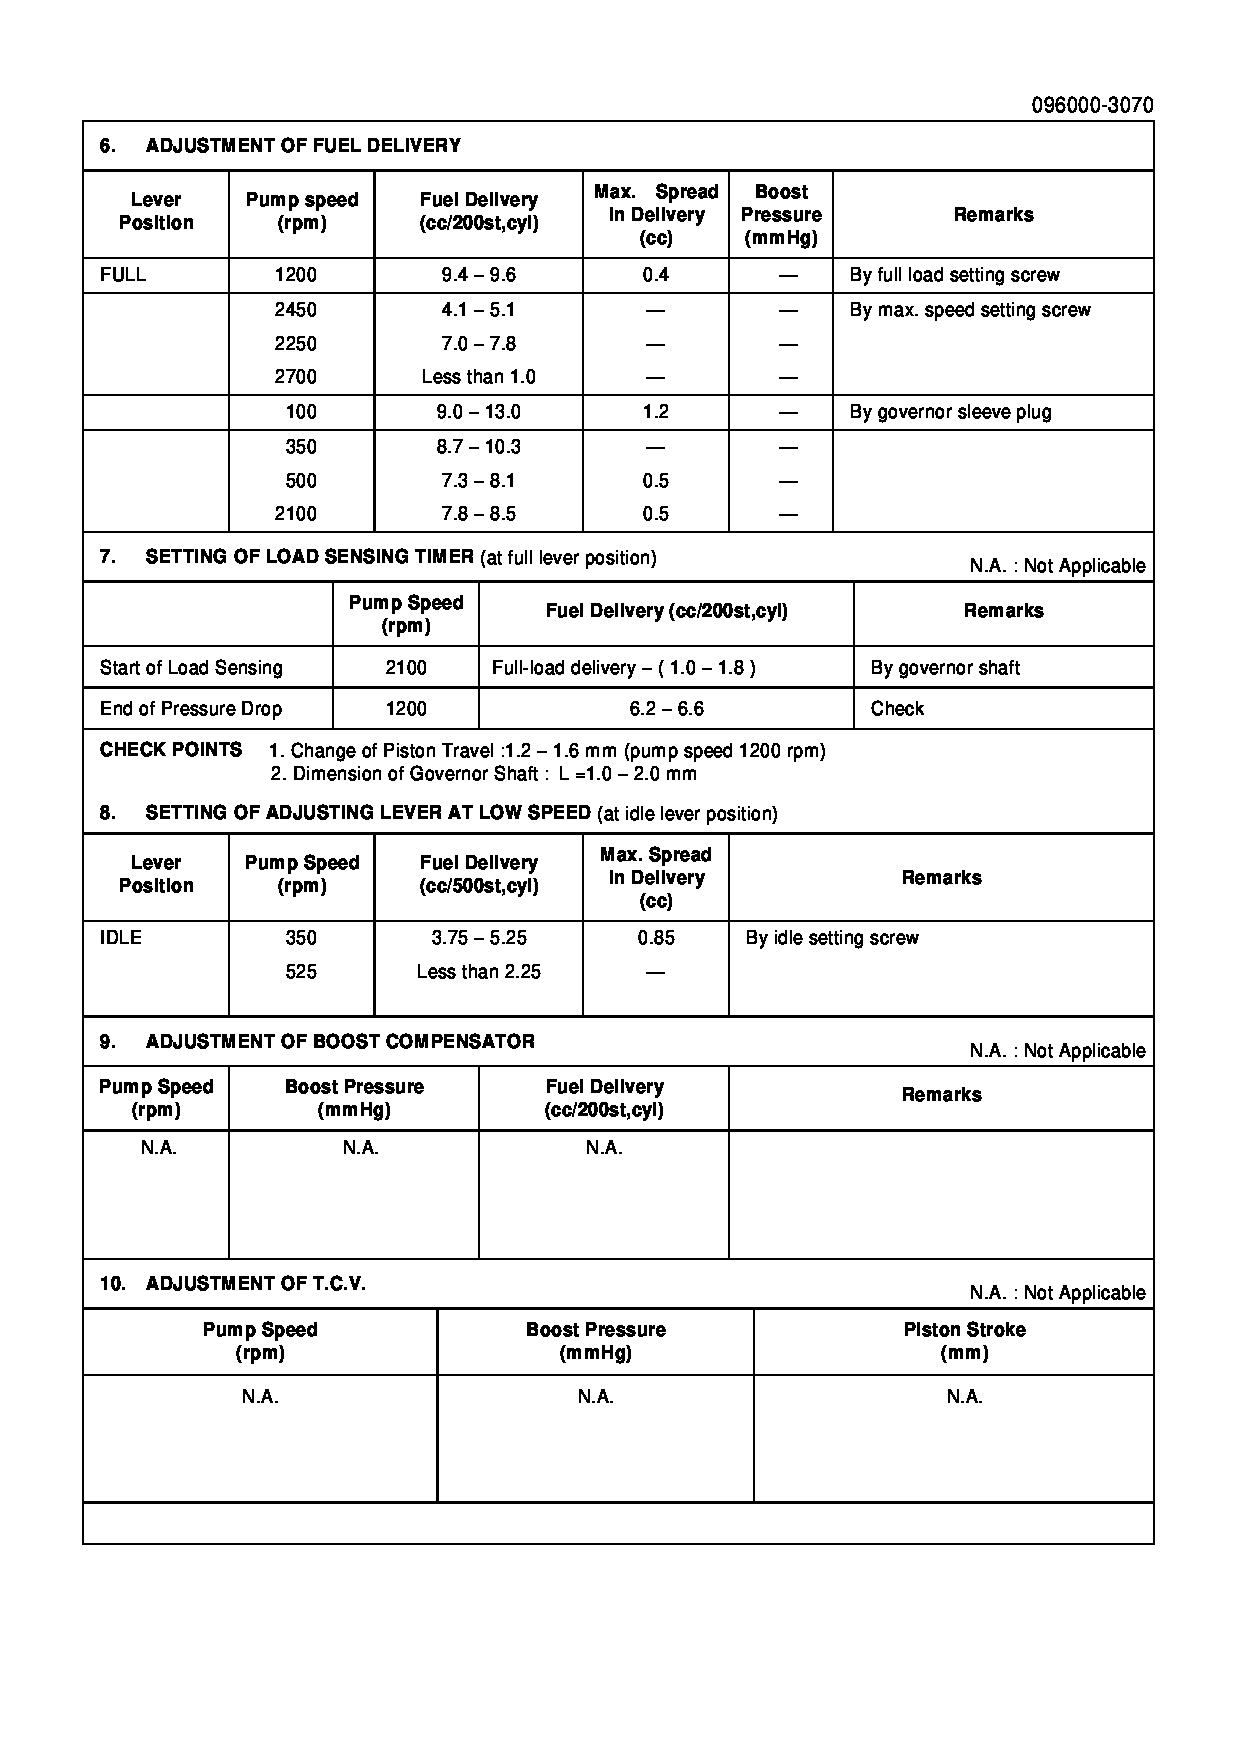
Rating:
Information pump assy, injecti Denso
Product
Fuel Injection Pump
Vehicle engine
HILUX 2L
Engine
2L
Serial start-end
8607--8808
Info
Injector Nozzle
093500-2860
Manufacture:
22100-54311 TOYOTA
Dim 1
3.2-3.4
Dim 2
5.7-5.9
Dim 3
0.35-0.55
Dim 4
Dim 5
Dim 6
Information
Injector nozzle:
0935002860
KIT List:
Part name
Kit1
Kit2
Compare Prices: .
As an associate, we earn commssions on qualifying purchases through the links below

2L 3L Heavy Duty Fuel Injection Pump 096000-3070, Compatible With Diesel Engines, Chromoly Steel Forged, ISO 9001 Certified, Fits VE4 VE Pump
Adfghjk Fuel Injection Pump 096000-3070, Compatible with 2L/3L Diesel Engines, ±0.005mm OEM tolerance for 15% efficiency boost. || Industrial-Grade Construction: Chromoly forged housing (HRC58) passes 5000hr bench tests, 3x lifespan. || Pre-Calibrated Performance: Dynamic pressure compensation (-30℃~150℃) with plug-and-play installation. || Global Compliance: ISO 9001 & Euro 6 certified for 500ppm sulfur diesel worldwide. || Multi-Model Fit: Direct replacement for VE4 VE Pump and 22100-54311 systems in heavy-duty vehicles.
Adfghjk Fuel Injection Pump 096000-3070, Compatible with 2L/3L Diesel Engines, ±0.005mm OEM tolerance for 15% efficiency boost. || Industrial-Grade Construction: Chromoly forged housing (HRC58) passes 5000hr bench tests, 3x lifespan. || Pre-Calibrated Performance: Dynamic pressure compensation (-30℃~150℃) with plug-and-play installation. || Global Compliance: ISO 9001 & Euro 6 certified for 500ppm sulfur diesel worldwide. || Multi-Model Fit: Direct replacement for VE4 VE Pump and 22100-54311 systems in heavy-duty vehicles.

VE4 Heavy Duty Diesel Engine Parts Fuel Injection Pump 096000-3070 22100-54311 VE4/9F2200RND307
VZUPNFAJ Fuel injection pump: advanced manufacturing technology can effectively improve the accuracy of fuel injection, keep the engine running stably and efficiently, and reduce fuel consumption. || Fuel injection pump: manufactured in strict accordance with automobile production standards, and the internal components are accurately matched to ensure that fuel is injected into the engine cylinder in time and accurately. || Fuel injection pump: perfect for your car, made of high-strength materials, with good wear resistance, and can work stably even in harsh environment. || Fuel injection pump: with excellent fuel metering function, it can adjust the fuel injection quantity in real time according to the working condition of the engine, and significantly enhance the power output of the engine. || Fuel injection pump: after strict testing, it has stable and reliable performance, can withstand high pressure and high load working environment, and provide continuous and stable fuel supply for the engine.
VZUPNFAJ Fuel injection pump: advanced manufacturing technology can effectively improve the accuracy of fuel injection, keep the engine running stably and efficiently, and reduce fuel consumption. || Fuel injection pump: manufactured in strict accordance with automobile production standards, and the internal components are accurately matched to ensure that fuel is injected into the engine cylinder in time and accurately. || Fuel injection pump: perfect for your car, made of high-strength materials, with good wear resistance, and can work stably even in harsh environment. || Fuel injection pump: with excellent fuel metering function, it can adjust the fuel injection quantity in real time according to the working condition of the engine, and significantly enhance the power output of the engine. || Fuel injection pump: after strict testing, it has stable and reliable performance, can withstand high pressure and high load working environment, and provide continuous and stable fuel supply for the engine.

VE4 Heavy Duty Diesel Engine Parts Fuel Injection Pump 096000-3070 22100-54311 VE4/9F2200RND307
QEDFGH Dependable Diesel Injection Pump || This diesel injection pump is designed to deliver consistent fuel flow, supporting stable engine operation. It is compatible with a variety of diesel engines and suited for regular use. || Quality Craftsmanship || Made from robust materials, this diesel fuel pump is built to handle regular wear and tear, providing reliable functionality for your vehicle or equipment. || Steady Fuel Delivery || This pump ensures even fuel distribution, helping to maintain consistent engine operation and smoother functionality. || Simple Installation and Wide Fitment || Designed for easy setup, this diesel injection pump fits a range of models and makes, making it a practical choice for repairs or replacements. || Supports Engine Performance || By maintaining stable fuel pressure and flow, this pump aids in reliable engine operation and starting, even in varying conditions.
QEDFGH Dependable Diesel Injection Pump || This diesel injection pump is designed to deliver consistent fuel flow, supporting stable engine operation. It is compatible with a variety of diesel engines and suited for regular use. || Quality Craftsmanship || Made from robust materials, this diesel fuel pump is built to handle regular wear and tear, providing reliable functionality for your vehicle or equipment. || Steady Fuel Delivery || This pump ensures even fuel distribution, helping to maintain consistent engine operation and smoother functionality. || Simple Installation and Wide Fitment || Designed for easy setup, this diesel injection pump fits a range of models and makes, making it a practical choice for repairs or replacements. || Supports Engine Performance || By maintaining stable fuel pressure and flow, this pump aids in reliable engine operation and starting, even in varying conditions.
Components :
Scheme #.#:
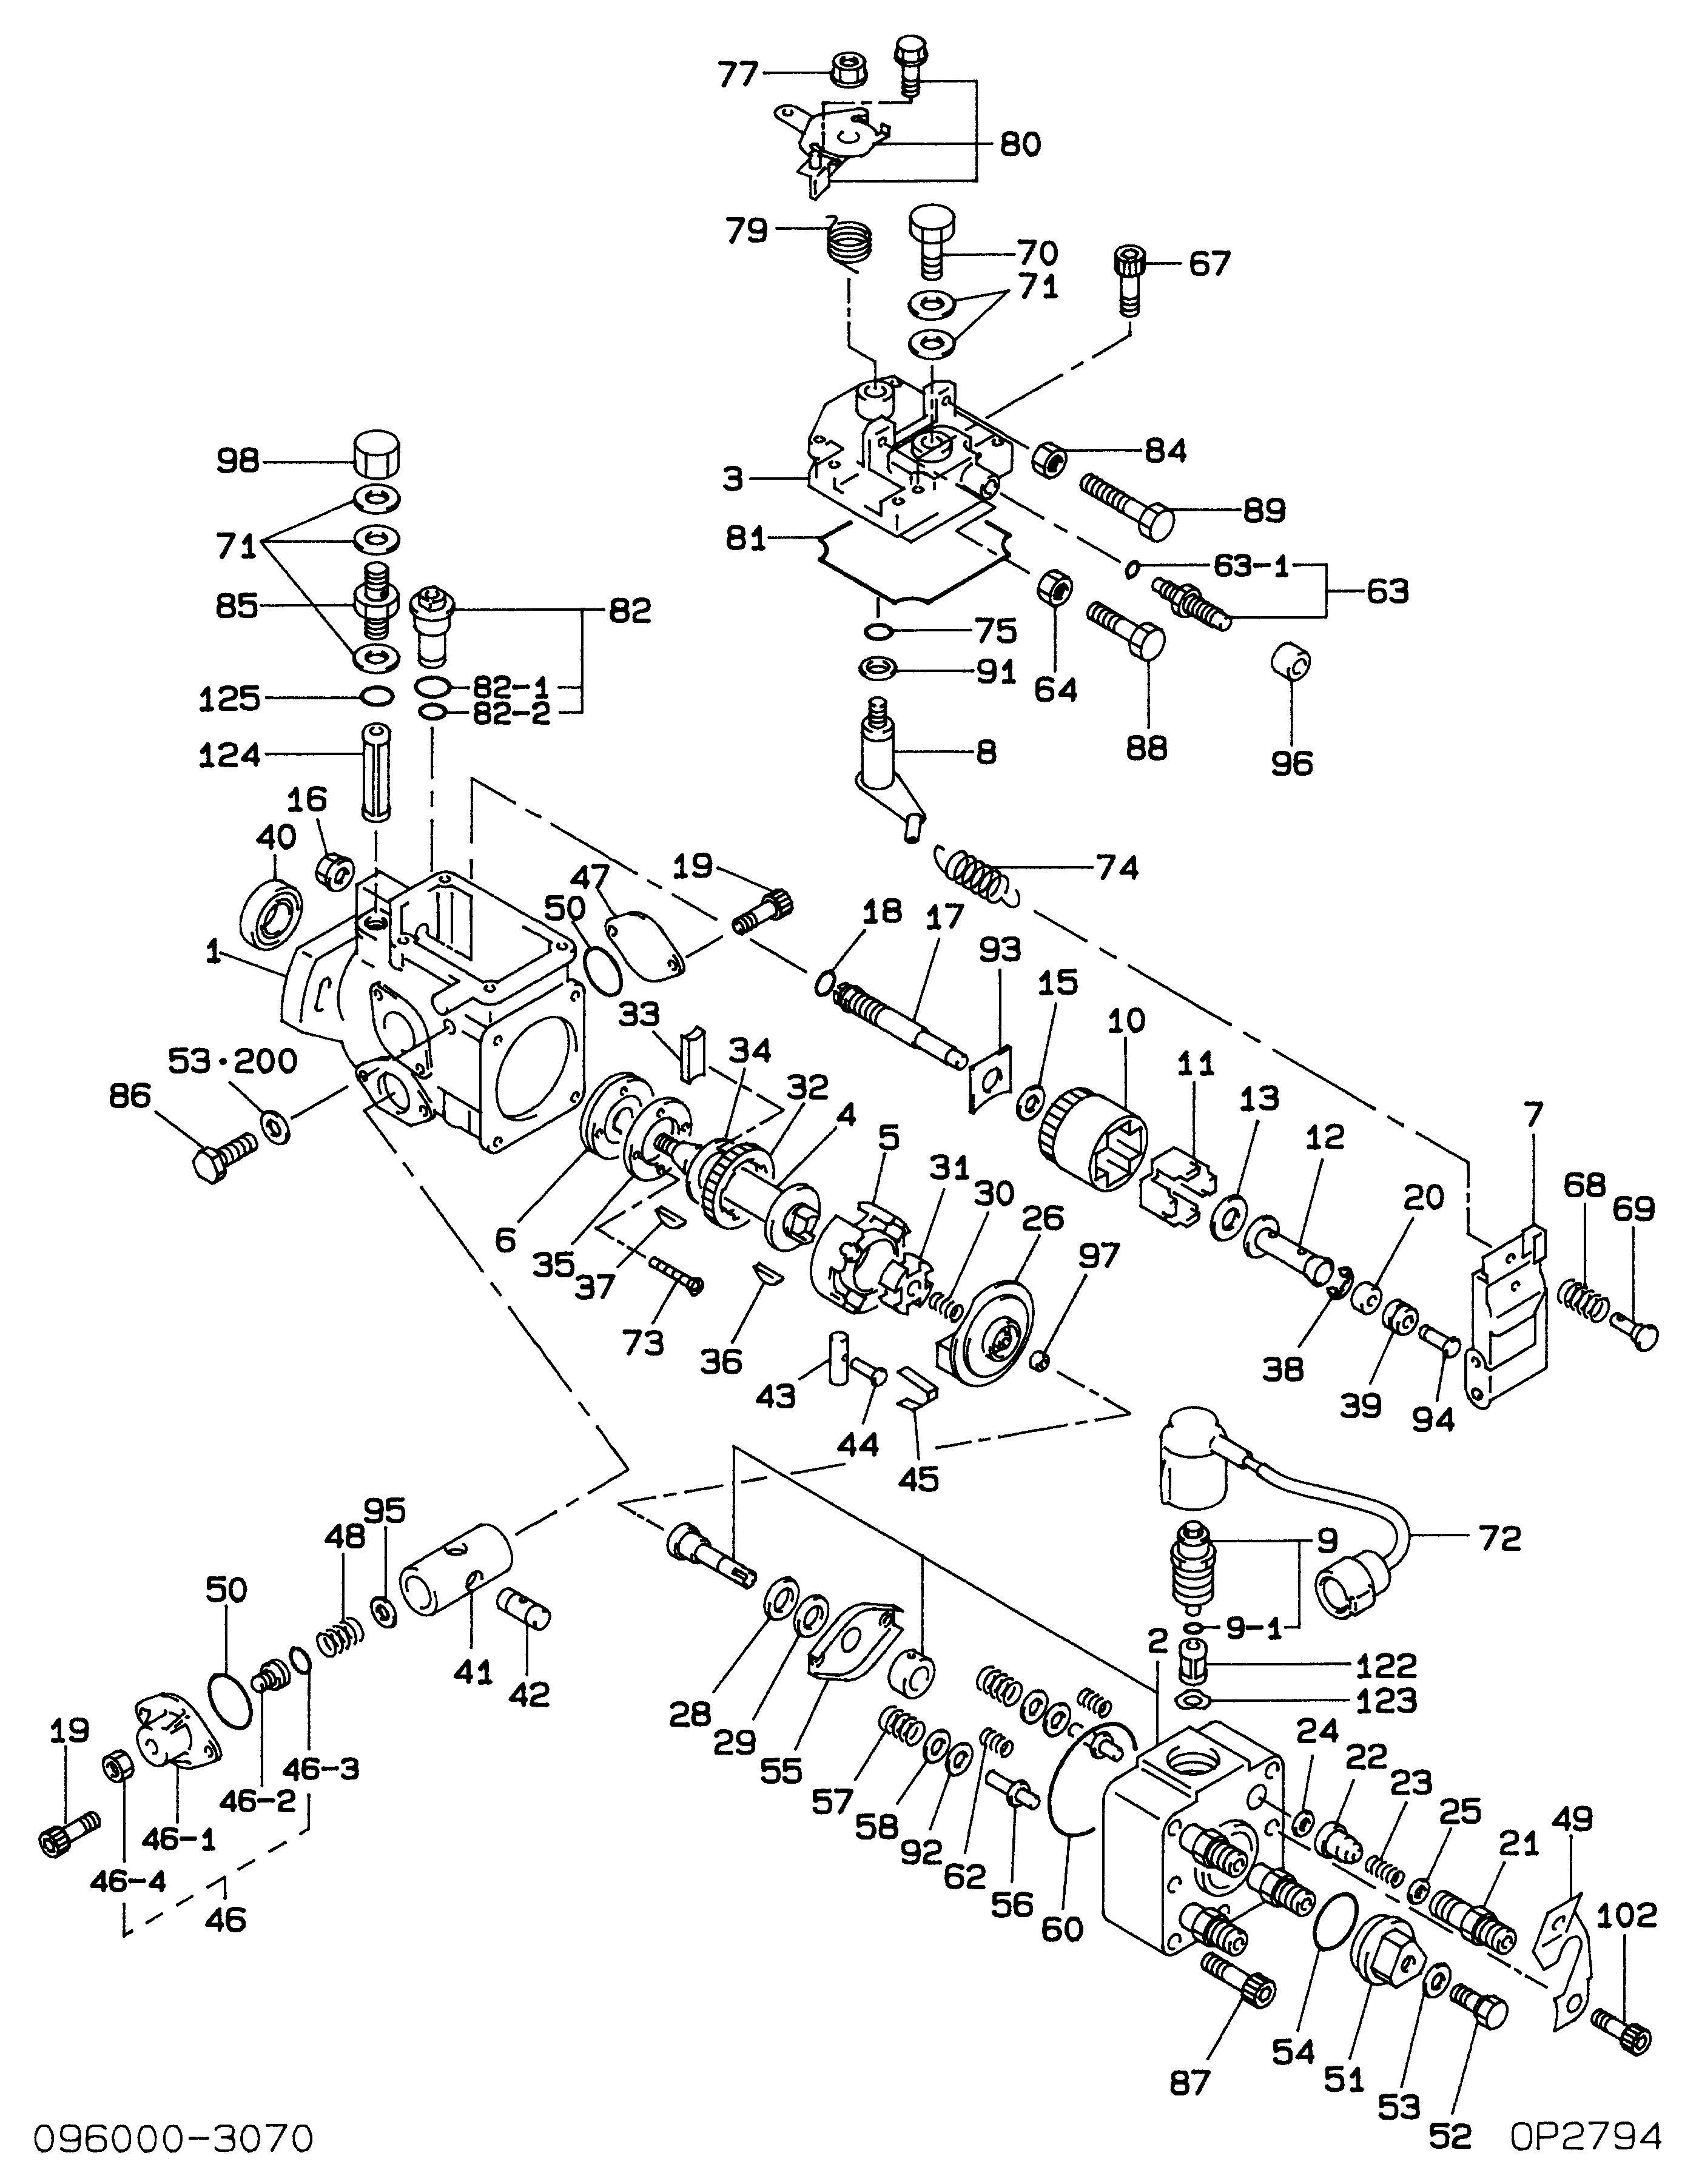
№
Qty
Part num
Name
Remarks
Manufacture num
000
[01]
09600-03070
PUMP ASSY, INJECTI
WITHOUT TACHO
22100-54311
TOYOTA
Include in ##:
09600-03070
as PUMP ASSY, INJECTI
Cross reference number
Part num
Firm num
Firm
Name
09600-03070
22100-5431
PUMP ASSY, INJECTI
0960003070
22100-54311
TOYOTA
PUMP ASSY, INJECTI
Information:
Introduction
This Special Instruction covers the removal procedure for DEF connectors on the models and applications listed above.Safety Section
Care must be taken to ensure that fluids are contained during performance of inspection, maintenance, testing, adjusting, and repair of the product. Be prepared to collect the fluid with suitable containers before opening any compartment or disassembling any component containing fluids.Refer to Special Publication, PERJ1017, "Dealer Service Tool Catalog" for tools and supplies suitable to collect and contain fluids on Cat® products.Dispose of all fluids according to local regulations and mandates.
Personal injury or death can result from improperly checking for a leak.Always use a board or cardboard when checking for a leak. Escaping air or fluid under pressure, even a pin-hole size leak, can penetrate body tissue causing serious injury, and possible death.If fluid is injected into your skin, it must be treated immediately by a doctor familiar with this type of injury.
Illustration 1 g00104545Prevent the machine from movement. Park the machine on a level surface.Attach a "Do Not Operate" warning tag or a similar warning tag to the start switch or to the controls before you service the equipment. These warning tags (Special Instruction, SEHS7332) are available from your Caterpillar dealer.Removal Procedure for Single Clip Connectors
Illustration 2 g03468077
(1) Line
(2) Retaining Clip
Clean the area around the connector with compressed air. Be sure to remove any dirt or debris before continuing with this procedure.
Press down on the line (1).
Press IN on the retaining clip (2).
Gently pull straight up on the line.Note: Do not pull out the clip, damage will occur to the retaining clip.Note: Do not pull off the line without the clip being fully depressed, damage will occur to the retaining clip.Removal Procedure for Dual Clip Connectors
Illustration 3 g03468506
(1) Line
(2) Retaining Clips
Clean the area around the connector with compressed air. Be sure to remove any dirt or debris before continuing with this procedure.
Press down on the line (1).
Press IN on the retaining clips (2).
Gently pull straight up on the line.Note: Do not pull out the clip, damage will occur to the retaining clip.Note: Do not pull off the line without the clip being fully depressed, damage will occur to the retaining clip.