Rating:
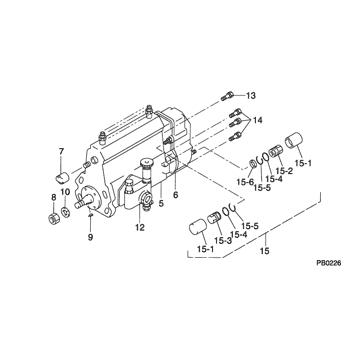
Information pump assy, injecti Denso
Product
Fuel Injection Pump
Vehicle engine
INDUSTRIAL S4S
Engine
S4S
Serial start-end
9810-
Info
Injector Nozzle
093500-5480
Injector nozzle:
0935005480
KIT List:
Part name
Kit1
Kit2
Components :
Scheme #.#:
№
Qty
Part num
Name
Remarks
Manufacture num
000
[01]
09200-03970
PUMP ASSY, INJECTI
A4,RSV
Include in ##:
09200-03970
as PUMP ASSY, INJECTI
Cross reference number
Part num
Firm num
Firm
Name
09200-03970
PUMP ASSY, INJECTI
Information:
2. Remove pipe (1) and the gasket between aftercooler cover (2) and the turbocharger. If necessary, remove the O-ring seals from the pipe.3. Remove the bolts and clamps that hold tube assemblies (3) to each end of the aftercooler. Remove tube assemblies (3) from each end of the aftercooler. If necessary, remove the O-ring seals from the tube assemblies. An O-ring seal on each end of the aftercooler core holds the adapters in position.4. Remove adapters (4) and the gaskets from each end of the aftercooler.5. Remove all bolts (5) that hold aftercooler cover (2) in position. Remove the aftercooler cover and gasket from the engine. 6. Remove aftercooler core (6) and the gasket from the engine. If necessary, remove the O-ring seals from the aftercooler core. Two of the bolts that hold the aftercooler housing in position are on the inside of the aftercooler housing.7. Remove the bolts and spacers that hold aftercooler housing (7) to the engine. Make a note of the location of the spacers. Remove the aftercooler housing and gaskets from the engine.Install Aftercooler
Inspect all O-ring seals and gaskets, and make replacements if necessary. 1. Put the gaskets and aftercooler housing (1) in position on the engine. Install the bolts and spacers that hold the aftercooler housing.2. Install the O-ring seals on the aftercooler core, and put a thin layer of clean engine oil on them. Put the gasket and aftercooler core (2) in position on the engine. 3. Put the gasket and aftercooler cover (3) in position. Install the bolts that hold the aftercooler cover. Force may be required to push the adapters around the O-ring seals on the aftercooler core. Make sure the O-ring seals stay in position on the aftercooler core.4. Put a thin layer of clean engine oil in the bores of adapters (4). Install a gasket and adapter on each end of the aftercooler core. 5. Install the O-ring seals on tube assemblies (5), and put a thin layer of clean engine oil on them. Put the tube assemblies in position on each end of the aftercooler, and install the bolts and clamps that hold them.6. Install the O-ring seals on pipe (6), and put a thin layer of clean engine oil on them. Put the pipe and gasket in position between the aftercooler and the turbocharger. Install the bolts that hold it.7. Fill the radiator with coolant to the correct level. See the Operation & Maintenance Manual.
Inspect all O-ring seals and gaskets, and make replacements if necessary. 1. Put the gaskets and aftercooler housing (1) in position on the engine. Install the bolts and spacers that hold the aftercooler housing.2. Install the O-ring seals on the aftercooler core, and put a thin layer of clean engine oil on them. Put the gasket and aftercooler core (2) in position on the engine. 3. Put the gasket and aftercooler cover (3) in position. Install the bolts that hold the aftercooler cover. Force may be required to push the adapters around the O-ring seals on the aftercooler core. Make sure the O-ring seals stay in position on the aftercooler core.4. Put a thin layer of clean engine oil in the bores of adapters (4). Install a gasket and adapter on each end of the aftercooler core. 5. Install the O-ring seals on tube assemblies (5), and put a thin layer of clean engine oil on them. Put the tube assemblies in position on each end of the aftercooler, and install the bolts and clamps that hold them.6. Install the O-ring seals on pipe (6), and put a thin layer of clean engine oil on them. Put the pipe and gasket in position between the aftercooler and the turbocharger. Install the bolts that hold it.7. Fill the radiator with coolant to the correct level. See the Operation & Maintenance Manual.


