Rating:
Information holder & nozzle se Denso
Product
Nozzle & Nozzle Holder
Vehicle engine
INDUSTRIAL 4D95S
Engine
4D95S
Serial start-end
8801-
Info
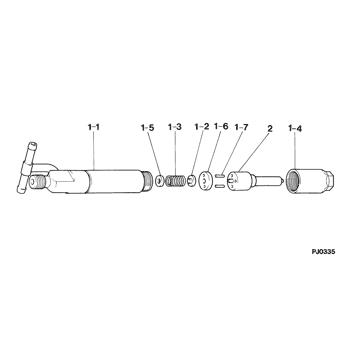
Injector Nozzle
Components :
Scheme #.#:
№
Qty
Part num
Name
Remarks
Manufacture num
000
[01]
09350-04070
HOLDER & NOZZLE SE
Include in ##:
09350-04070
as HOLDER & NOZZLE SE
Nozzle Specification:
Parts number
0935004070 KOMATSU
Nozzle
0934005601
First opm
22.54-23.52
First op
230-240
Second om
-
Second op
-
Torquen
39.2-49.0
Torque
4.0-5.0
Prelift
-
Max lift
Engine
INDUSTRIAL 4D95S
Information
Include as Nozzle:
Cross reference number
Part num
Firm num
Firm
Name
09350-04070
HOLDER & NOZZLE SE
Information:
Engine Runs Rough
Possible Causes/Corrections Misfiring Cylinder(s)See "Misfiring and Running Rough". Fuel Injection Timing Not CorrectCheck and make necessary adjustments as in Testing and Adjusting Section of this Service Manual. Automatic Timing Advance Does Not Operate CorrectlyCheck with engine warm. Use the 8T5300 Timing Indicator Group and 8T5301 Diesel Timing Adapter Group. Special Instruction, SEHS8580 has instructions and calibration procedures for this tool group. If the timing indicator group is not available, make rapid "acceleration" (increase in speed) from low idle to high idle. Engine must have smooth acceleration. A timing advance that does not operate correctly can cause delays of the engine acceleration at some rpm before high idle, or possibly cause the engine to run rough and have exhaust noise (backfire) during acceleration. This condition is difficult to find if engine acceleration is slow or at a constant engine rpm. Air In Fuel SystemWith air in the fuel system, the engine will normally be difficult to start, run rough, and release a large amount of white smoke. If the engine will not start, loosen a fuel injection line nut at the through the head adapter and crank the engine until fuel comes out. Tighten the fuel line nut. If the engine still does not run smooth or releases a large amount of white smoke, loosen the fuel line nuts one at a time at the through the head adapters until the fuel that comes out is free of air. Tighten the fuel line nuts. If the air can not be removed in this way, put 35 kPa (5 psi) of air pressure to the fuel tank.
Do not use more than 55 kPa (8 psi) of air pressure in the fuel tank or damage to the tank may result.
Check for leakage at the connections between the fuel tank and the fuel transfer pump. If leaks are found, tighten the connections or replace the line. If there are no visual leaks, remove the fuel supply line from the tank and connect it to an outside fuel supply. If this corrects the problem, the suction line (standpipe) inside the fuel tank has a leak.
