Rating:
Information element sub-assy, Denso
Compare Prices: .
As an associate, we earn commssions on qualifying purchases through the links below

$32.79
12 Apr 2024
CN: Diesel Injection Par
Cabezales 4Pcs 090150-1790 Pump Element Fuel Injector Plunger 14911-51051 1790 Plunger Barrel Assembly Fits for Kubota E11 E110 E120 E7 E70 E75C2 E75C3 E8 E85 E9 E95
Cabezales Manufacturer MFR Number:090150-1790 14911-51051 Stamping No.:1790. || Package: 4 pieces of plunger and barrel.Neutral packing. || Application:Fits for Kubota . || Premium Quality:Our plungers and barrels made of premium strength metal and composite plastic.we have a good air and fuel mixing ability and excellent ability of fuel pump systems,and plunger assembly be inspected reliability and durability in the factory. || Notice:Please you carefully check your vehicle plunger barrel and make sure that the number must be completely the same as our description fitment,if you have any problem,please you contact us by email,we will have professional customer service within 24 hours.
Cabezales Manufacturer MFR Number:090150-1790 14911-51051 Stamping No.:1790. || Package: 4 pieces of plunger and barrel.Neutral packing. || Application:Fits for Kubota . || Premium Quality:Our plungers and barrels made of premium strength metal and composite plastic.we have a good air and fuel mixing ability and excellent ability of fuel pump systems,and plunger assembly be inspected reliability and durability in the factory. || Notice:Please you carefully check your vehicle plunger barrel and make sure that the number must be completely the same as our description fitment,if you have any problem,please you contact us by email,we will have professional customer service within 24 hours.

$54.29
25 Nov 2024
KR: Adabus
090150-1790 diesel fuel injection pump plunger 1790
Generic Placement on vehicle: Fuel injection pump || Country/region of manufacture: China || Material type: iron || Item weight: 0.2KG
Generic Placement on vehicle: Fuel injection pump || Country/region of manufacture: China || Material type: iron || Item weight: 0.2KG
$33.09
07 Mar 2022
RU: Boicus
Davitu Fuel Pumps - 090150-1790 diesel fuel injection pump plunger 1790
DAVITU 100% Brand New & High Quality || Manufacturer part number: 1790 || Country/region of manufacture: China || Placement on vehicle: Fuel injection pump || Item height: 10CM
DAVITU 100% Brand New & High Quality || Manufacturer part number: 1790 || Country/region of manufacture: China || Placement on vehicle: Fuel injection pump || Item height: 10CM
Include in ##:
Number on scheme 006

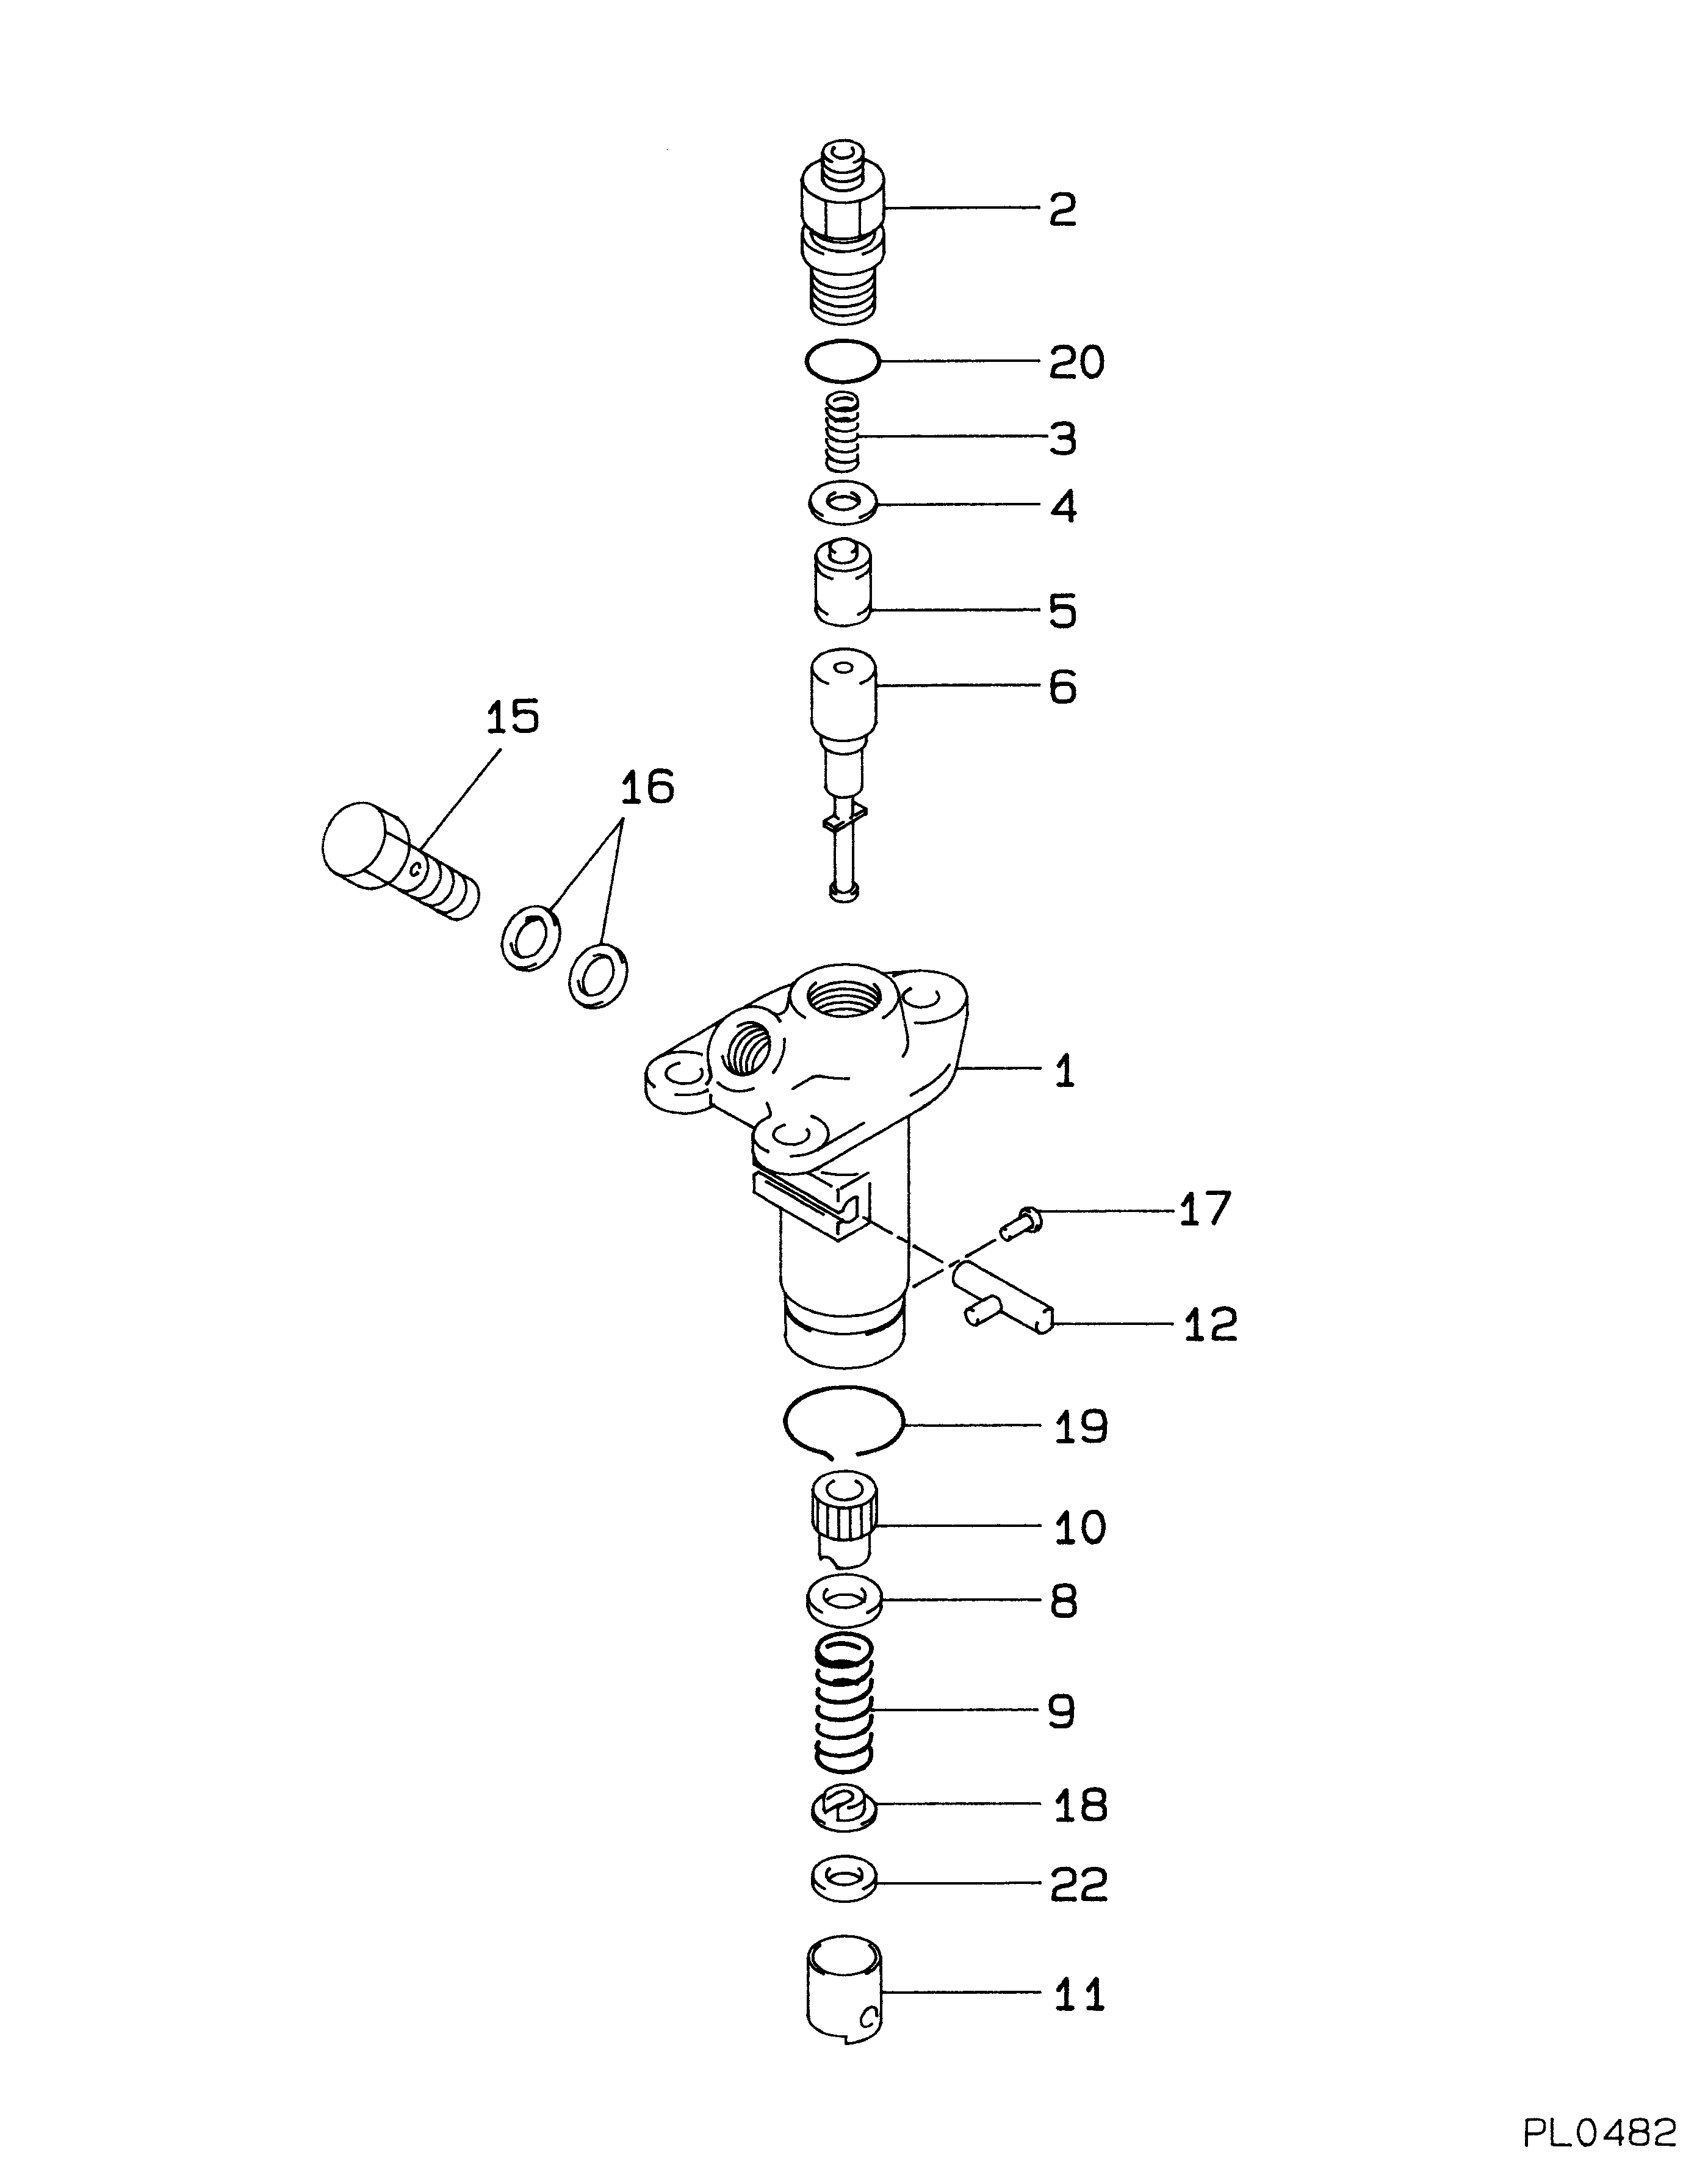
09450-01190
as ELEMENT SUB-ASSY,
Cross reference number
Part num
Firm num
Firm
Name
09015-01790
14911-5105
ELEMENT SUB-ASSY,
0901501790
14911-51051
KUBOTA
ELEMENT SUB-ASSY,
Information:
CAMSHAFT LOBE
A. Lobe lift. B. Lobe height. C. Base circle.With camshaft installed in the cylinder block, check end play. End play with new components should be .007 .003 in. (0.18 0.08 mm). The maximum permissible end play is .020 in. (0.51 mm).Camshaft Followers
Use an 8S2293 Magnet to remove the cam followers.
REMOVING CAM FOLLOWERSCam followers establish a wear pattern with the camshaft lobes. Identify and reinstall the followers removed. Dishing or circular wear pattern is allowed on the cam follower face, providing the wear face keeps a polished appearance. Replace the follower if the wear face is rough or shows signs of scuffing. A new follower can be used with an old camshaft, providing the lobe is in good condition. Put engine oil on the cam followers and the camshaft lobes before installing the cam followers. Use new cam followers with a new camshaft.Camshaft Gears
1. Remove screw (1) and washer (2) from end of camshaft.
REMOVING TIMING ADVANCE RETAINING SCREW
1. Screw. 2. Washer.2. Remove timing advance unit from the camshaft.3. Install puller (A), with spacer (C) over the shaft in the camshaft spacer (B) on spacer (C) as shown and remove the gear from the camshaft.
REMOVING GEAR (Typical Example)
A. 1P2321 Puller. B. 8S5579 Spacer. C. 9S9155 Spacer.To install the gear use the following procedure:1. Heat the gear to a temperature of approximately 400°F (204°C) before installing on the camshaft.
Do not heat the gear with a torch. Do not heat the gear to a temperature of more than 600°F (315°C). Heating the gear with a torch or to a temperature of more than 600°F (315°C) may cause the two drive dowels for the automatic timing advance to loosen and come out of the gear.
2. Align slot in gear hub with the pin in the camshaft. Install the gear on the camshaft with timing mark on gear aligned with timing mark on crankshaft gear. Be sure the gear is completly seated against the shoulder of the camshaft.
Do not drive the gear on the camshaft.
3. Align holes in weights with dowels in gear and install the automatic timing advance.4. Align pin (3) in washer with hole (4) in camshaft and install washer (2).5. Install screw (1) and tighten to 72 5 lb. in. (8.2 0.6 N m). Stake screw in two places.
INSTALLING WASHER
2. Washer. 3. Pin. 4. Hole.
Stake screw (1) carefully. Heavy blows on washer or screw can force the shaft extension too far into the camshaft and eliminate all end clearance.
6. After screw (1) is staked, the gear and weight assembly for 3160 and 3208 Engines (79V1-79V1407) requires .003 to .027 in. (0.08 to 0.69 mm) end clearance to prevent binding against the washer, camshaft end, or camshaft gear. All 3208 Engines except (79V1-79V1407) require .003 to .037 in. (0.08 to 0.84 mm) end clearance.
STAKING SCREW
1. Screw.Camshaft Bearings Removal And Installation
Remove camshaft bearings using the 1P5544 Washer (1) and S509 Bolt (2), from the 1P5545 Adapter Group, in conjunction with the 8S2241 Camshaft Bearing Removal and Installation Group,